Happy New Year! Bottle Tag


Hi everyone! The new year is fast approaching and that means that many of us will attend a gathering of some sort to celebrate the arrival of 2018. Often a bottle of wine is an easy and appreciated choice for a hostess/host gift. I thought I would create a bottle tag instead of the usual wine bag to make it a little extra special. 

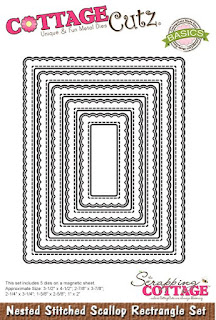
To construct this tag, I started with a piece of black glitter card stock and used a Scalloped Nested Die to cut the bottle neck hole. Then I used the Birch Tree die as the background and slipped the doe and fawn into the trees. The Happy New Year Ornament was cut out of gold card stock and placed on top of a doily from the Nested Stitched Doily set cut out of white holographic paper. For a final touch, I applied some chunky white glitter at the feet of the deer to appear as if they are standing in snow. You could skip this step if you are in a hurry or do not have the glitter on hand.  

This tag was made using the dies shown below but if you do not have these particular designs, use your creativity to decorate your tag in another way. For example, it does not have to say anything about the new year. Instead, you can use a Thanks or other Expression die in combination with other shapes to create your own bottle tag. There are many occasions it could be used for as well. For example, you could decorate it to celebrate a birthday or to congratulate someone for something. 


This tag was surprisingly quick to construct when you let the dies do all the work for you. If you wanted to put more time into it, you could shade the deer and the birch trees but I really wanted to show you could create this without much fuss and still get a great result.

To learn how to construct this bottle tag, click on the YouTube thumbnail below. 


Thanks for joining me here at the Scrapping Cottage. I hope you have a very happy New Year!

- Janet

Dies used for this project:


Hi! Today, I have a fun get well card that showcases an adorable little puppy in the Nurse Puppy die set from the Scrapping Cottage.

As the case with many CottageCutz dies, you are getting a lot packed into one die. Nurse Puppy includes the cute little puppy plus seven additional accessories related to the medical field. SEVEN!

Since there is so much in this set, my video today concentrates on how to piece together the puppy and all his accessories. Even if you don’t have this die, seeing how it comes together will help you pick up some tips that will come in handy with similarly detailed sets.
   
Click on the video thumbnail below to see how I put this little cutie and all her accessories together. You can also click on this link if the thumbnail is not working on your device: NURSE PUPPY PIECING TUTORIAL


Does this card base seem familiar? It’s a design that one of the Design Team members, Lois Bak, posted here a little over a year ago titled Center-Step Mushrooms. Her card base designs are always full of interest. This card base is one of many that I have stored away in my archives. I thought the center step design would work great to feature all eight pieces in this die set and I wasn’t disappointed. If you’d like to revisit her post on the blog to get the card base instructions, here is the link to that post. She includes all the measurements and instructions in it for the card base and the mushrooms she artfully placed on it: CENTER-STEP MUSHROOMS

As additional help, I’ve recorded a video tutorial of the center step card construction on my channel. Click on this link: CENTER-STEP CONSTRUCTION TUTORIAL or click on the thumbnail below:


Thanks for visiting me today. See you soon!

Hugs,

Janet

Dies used in this project:


Quick & East Christmas Cards #3

Hello everyone! I have posted the 3rd and final Quick & Easy Card #3 on my YouTube channel. 

This card uses again the same large Merry Christmas element on the front but adds an embossing folder pattern and a single cut CottageCutz bell die cut to accent the greeting. All in all, this card is also very quick to put together, especially if you employ an assembly line process. If the video thumbnail doesn't work on your phone, you can click directly on this link instead: Quick & Easy Christmas Cards # 3 (Link)
All the supplies are listed in the video description. I hope you'll stop by and watch all 3 Quick & Easy Christmas cards in the series. 


Take care and see you soon!

-Janet

Quick & Easy Christmas Card #2

Hello there! Christmas is soon upon us and if you're like me, you've been thinking about sending out some Christmas cards. There's so many great cards you can buy but why not consider making your own this year? It can be done if you plan a simple card design that you can replicate quickly.

That's what my Quick & Easy Christmas Card series is here to help with. It's the second card in the series so if you missed the first one, please be sure to click on the thumbnail below or at this link: CARD 1


Card #2 is a little more complicated but still very doable and really not all that more time consuming. It's a pretty card showcasing a gold greeting and gorgeous big gold snowflakes on a blue background. It can be found on the thumbnail below or at this link: CARD 2


Supplies used for this card:

White card stock for 5 x 7 card base
White card stock for center panel 4.5 x 6.5 
VersaMark Ink
Ranger Extra Fine Detail embossing powder - gold

Distress Oxide ink - Broken China
Designer Stamps from Echo Park Co. - Christmas Sentiments & Snow is Falling

Oh No Kitty Get Well Card - Double Window Fancy Fold

Hello everyone! It's my turn to share a project using CottageCutz dies for the Scrapping Cottage. I all of you enjoyed a few days off and lots of time with family and friends! Likely among all that you visited with there were people recovering from a cold or some other ailment. It seems so many people are suffering with something or other right now.

There's no better way to make someone feel better than to receive a cheery get well card from someone. Well, we have that covered! You've been seeing lots of the new get well projects from our talented design team lately and I'm showing another twist on the Oh No Kitty die. This kitty is so darn cute with all of his little owies bandaged up! I couldn't help but us it on a project.


Click on the thumbnail link to learn how this double-window card was made. It's a little tricky to cut the windows so they are centered over each other but pretty easy once you learn a few tips. You can also click on this link to watch the video: VIDEO LINK


If you'd like to see all twelve of the Get Well themed dies in the new release, click on the thumbnail link below. You can also get there by clicking on this link: VIDEO LINK

These dies and many others found in the Scrapping Cottage site are on sale through December 1st. Don't miss it!


Dies used in this project:


Hello everyone! I'm so happy to show you what I've been up to lately. Christmas is going to be here soon and I am working on Christmas cards and tags at a feverish pace. Did you know there are only 5 Mondays left before Christmas! Yikes! There's a lot to do!


Lately I have been so inspired by card makers who are using mixed-media elements in their projects. Although an entire card was overwhelming, I felt I could tackle some tags using the new Christmas Tags die cut set. Somehow it's not as daunting when you are working on a smaller canvas.


I experimented with a number of different mediums on these tags and they turned out rather glamorous and diva-like. Some of the products I used were Distress Oxide inks, glimmer sprays, water, sequins, gold paste, perlen pens, gems, brads and Christmas mini-ornaments. I also used all kinds of ribbons from the traditional to furry and a few things in between! Most of these items were already in my stash, I just had to pull them out and put them to use!


This set also has a lot of little shapes you can use on these tags and they're sized just right for them. Instead of using the pieces, I used the negative space in the die cut as a template for the gold paste. Now I'm thinking about all the other applications for using negative space as templates for paste, spray or inks. It was a little tricky but it's the first time I've used a paste and ultimately I was pleased with the results. I definitely learned a few things by doing this project and I am warming up to the mixed-media style. I'm going to try something a little larger now that I have a little experience under my belt.


I invite you to watch my tutorial on these tags and learn along with me. I hope you'll be inspired to try something out of your comfort zone. It's satisfying to stretch your wings a little and try something new! These tags were the perfect size and scope for experimentation. Love it!

Click on the thumbnail below click on this link:
Tag Video


Enjoy the rest of your week!

Hugs,
Janet

Products used for this project:

Country Bird Christmas Shaker Card

It's me again! It's Day 2 of the video blog hop and I'm posting a project today that features the new stamp and coordinating die called Sparrow on Post. 

I grew up in the country where sparrows were the most common bird around. This fella spoke to me and said, "Craft with me!" How could I say no to the little guy!

Follow the link below to watch the video tutorial. Learn some tips on how to cut thick burlap, using your dies and fun foam to create a shaker window well and a couple alcohol ink coloring tips and tricks. If you can't see the link, you can also click on this link to see the video: https://youtu.be/60pqwfe_fA4


Thanks for stopping by! Be sure to follow the links in the video description to the other 7 videos. To be entered for great prizes including a surprise CottageCutz Grand Prize and their CottageCutz channel prize, you must comment and subscribe to every designer's channel. Each artist is giving away great stuff too so be sure to get in the fun.

Thanks so much and I hope you have a fantastic weekend!

- Janet

Let the Video Blog Hop Begin!


Happy Friday all! The CottageCutz blog hop is officially kicked off! Follow the link below to the first video. Links to the other videos are in the description. There are so many awesome prizes for you to qualify for! Each artist may have some different requirements for their prizes so be sure to listen carefully. To qualify for the CottageCutz channel and the CottageCutz Grand Prize, you only need to comment and subscribe to every channel in the hop. I've seen some sneak peaks and the holiday inspiration you are going to see will blow you away and get you started on your own holiday projects. Hugs everybody! See you at the hop!

P.S. - The winner of the Tuesday Hop Announcement video can be found in today's video description. Thanks to everyone who commented. I so appreciate and treasure each and every one of you!

- Janet

-

Hop Announcement, Haul and Prize Giveaway!

Hello everyone. I'm excited to announce that the Scrapping Cottage is sponsoring a video blog hop which will be held this Friday and Saturday, October 27th and 28th! Six talented YouTube crafters will be showing off their interpretations of some of the new holiday release dies during the hop. I've seen some sneak peeks and there's going to be some beautiful projects and a variety of project types to give you some inspiration as we start thinking about making all of our holiday creations this season. Please read the whole post because there is an opportunity for a pre-hop giveaway from me that you can qualify for today.

Here's a summary of the hop details:
1) It will start with some videos being released on Friday and some on Saturday.
2) The CottageCutz hop video will be released right here on Friday morning.
3) Friday's video will include links to all the project videos in the hop so you can visit them all.
4) You'll have about a week after the hop ends to watch all the videos before the prizes are drawn.
5) The CottageCutz video channel will be giving a $20 store credit to the lucky winner who comments and subscribes to all the channels!
6) Doing #5 will also automatically enter you in the Grand Prize drawing for the hop. This is going to be something really special from the Scrapping Cottage!
7) Every artist will be giving something fabulous away as well. Make sure you watch their videos to learn what to do to qualify for their channel prizes.
8) I'll be giving away a 24 pack of Spectrum Noir markers to a lucky participant over at my channel!
9) Have FUN and be INSPIRED!

So now on to my video for you guys. In it, I repeat the information for the hop and I also show you the dies I received as a DT member to use in my projects here on the blog. Although there are a lot of them, it's still a drop in the bucket compared to all the designs that are part of the release. It's a truly a mammoth release of holiday goodness!

Today's Giveaway:
After you watch the video below, leave a comment in the video description section to say that you'll be hopping with us and hit the thumbs up icon. That's all it takes to be entered into the drawing! You'll see what's included in the prize at the end of the video. I'll include the winner's name in the description of Friday's hop video so make sure you come back to find out who won.


Have a great week and I'll see you back here on Friday!

-Janet

Spooky Halloween Orb

Happy Wednesday! Just a couple more days until the weekend. Yeah! Hope your week has gone well so far. 

Today I'm presenting my final CottageCutz Halloween project of the season. In today’s video, I will show you how I used a die set that is part of the Christmas release along with two of the new Halloween dies to create a spooky glowing orb card. I know it’s getting close to Halloween but it’s still not too late to get new dies in time to make some great cards before Halloween arrives.


Before I describe more about today’s project, I want to share exciting news with all of you. The Scrapping Cottage is sponsoring a VIDEO BLOG HOP on October 27th and 28th. It will feature several of the new holiday dies. Many prizes will be given away from the video artists and Scrapping Cottage is providing the Grand Prize! More information will be coming in a future post so keep an eye out for it. 

So back to today’s card! My inspiration is the orb that the Wicked Witch used in the classic Wizard of Oz movie with Judy Garland. I wanted to create an orb that looked like something was inside it and I wanted it to appear to glow from within. Unfortunately, I didn't have any flying monkeys or poppy fields available for my orb but that didn't deter me! 


I used the base and bow of the new Snowglobe with Fawn die but used the Stitched Circle Set to build a thick frame out of several cardstock layers and an acetate layer under which the Ghost House resides. Then I used the Halloween Phrase & More die for the sentiment. I also used the witch’s hat and the Jack O’ Lantern from the phrase set as additional props for the card. Click on the video thumbnail and learn more about how this card was put together or click on this link: Spooky Halloween Orb Video


Well, thanks for stopping in to have a look at today’s project. Have a great week!

- Janet

Dies used in this project:


Santa and Snowman Window Cards

Hey everyone! It's Janet dropping by to show you two cards I made using two new holiday release dies. The first is called Window With Shutters and it has a great window, complete with a header, flower box and shutters. This die could be used year round to create a cute window scene by itself or filled with characters of your choosing that fit in the window space.
.

Today, I chose to use the companion die set made just for this window called Window Christmas Friends. It includes adorable Christmas figures including a pine tree, Santa, Snowman and Poinsettias with greens for the flower box.


Since the Santa and Snowman are both cut when you use the set, I decided to use both in each card. Nothing should go to waste right?! For Santa, the snowman is saying hi when you open the card. The opposite is true if the snowman adorns the front. I also used the Nested Stitched Scallop Rectangles inside for the stamped sentiment and die cuts. These are such cheerful little figures!


To learn how I made this card including how I created the acetate window effect, click on the video below. I hope you enjoy this one because I had a lot of fun creating them!

Have a great week and thanks for spending some time with me today.

Hugs,
Janet
SugarShine Designs


Dies used for this project:


Apple Watch - Creating a Faux Red Digital Crown

Hi everyone! Today I'm showing you something a little different than normal. You see, I recently received an Apple Watch 2 for my birthday. I love the watch but it was a little bit of a bummer to hear that the Apple Watch 3 was coming out the very next month. 

As it turned out, the only aesthetic difference between my watch and Apple Watch 3 is that the newest version comes with a red center in the digital crown. As soon as I saw that, I knew just how to create my own faux red digital crown.

This video walks you through a tutorial to create your own faux crown with red vinyl. It's really easy, especially when I give you all the measurements you need. I took all the trial and error out of it for you. 

If you don't have an Apple Watch but someone in your family does, whip up their own red digital crown or any color you choose! They will think you are a genius! 

In addition to the crown, I also show you how to make a vinyl cover for the side button. It's a nice way to make your watch extra stylish!

Click below to see the video. 


Thanks for joining me today. Have a great week!

- Janet

Happy Haunted Halloween!

Happy Wednesday! I'm so excited because it's finally fall and it's time to start creating projects for my second most favorite holiday of the year, Halloween!

CottageCutz has gotten another outstanding new collection of Halloween dies ready just in time for all your creative naughtiness. Fortunately no candy is ever harmed in the making of our fun Halloween projects. Well, no candy that survives to tell the tale anyway! 

Today's card features a super versatile set of Halloween phrases called Halloween Phrase & More. It's "more" because in addition to four cute phrases, there are also four icons that could be used on your planners, tags and just about anything your tell-tale heart desires. The spooky haunted house is also new and it's called Ghost House. I love working with the CottageCutz silhouette-style dies like this one. With one pass and a single color of card stock, you are ready to start creating your project. They also work great when you want to use a patterned background because they always enhance your scene without adding a lot of colors to compete for your eye's attention. 

I had so much fun creating this project for you. Click on the video thumbnail below to learn how you can make your own or inspire you to put your twist on it.
Please note that the store is currently on hold while their warehouse is in the process of being moved to larger digs to serve you better. Today's dies will be available when the store opens again on September 20th. But don't get scared. The store will be back in a frog's leap. Until then, jot down your wish list items and stop by again to place your order. 

I hope you finish out the week strong and don't forget to check back every day for some more fall ideas. It's guaranteed to be a scary good time! 

Hugs,
Janet 


Dies Used In This Card:

Rub-A-Dub-Dub Birthday!

Hello all! I hope the week is treating you well so far. It's back to school time and I'm sure many of you sent your students off to start a new year like I did yesterday. Time flies alarmingly fast!

For your viewing pleasure today, I'm taking a little break from the wedding theme to bring you a birthday card for a little one in your life. It features the Bathtub Time die that that was part of the baby release this spring. This die has ten individual elements you can use to create a large variety of scenes. It's a great die to play around with and easy to construct. There are enough pieces to decorate both the front and the inside of a card like I did on this one.


I also used the Stitched Oval Set to create the frame on the front and the mat inside the card. The Happy and Birthday Expression dies were used for the sentiment inside.

To learn how this card came together, please click on the YouTube thumbnail or the link below:
Bathtub Time Birthday Card Video

If you are a fan of embossing or want to some additional ideas on combining embossing techniques, I think you'll enjoy this one.


Thanks for spending a few minutes with me today. I'll be back tomorrow with another video.

- Janet

Wedding Cake & Butterflies Wedding Card

Happy Sunday! It's a beautiful day and I want to share some creative inspiration with you. 


Today's project is a card featuring the beautiful new CottageCutz Tiered Wedding Cake die. I had a lot of fun putting it together. It has a lot of small pieces but I found a way to make them easier to manage and color. I share this tip with you in the video and show you how well it works. You may have seen it before but you'll get to see it in action in the video.


The card also features the new CottageCutz Nested Stitched Eyelet Oval Set, the Celebrate Expressions Die, Butterflies, and the Leafy Foliage dies. 


I cut all the pieces in white card stock and used my Spectrum Noir markers and clear Wink of Stella so that each of the die cuts complemented each other as a set.

For full instructions and a look at how it was put together, click on the video link below.


It was great spending a little time with you today. I hope the rest of your weekend is great!

- Janet

Dies Used In This Project: