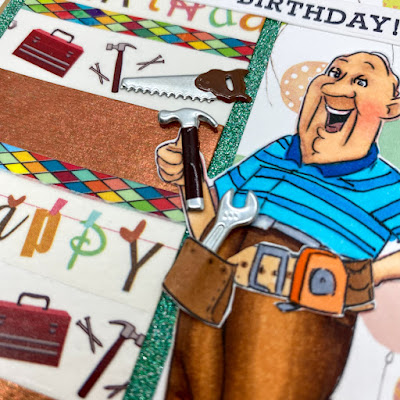
Hello crafty friends! Today I'm here with a fun masculine card featuring Eyelet Outlet brads and washi tape. I've used many different washi tapes on this card. It all works together to create a happy birthday tool man theme.
I've also added tool brads to this card. I think the wrench and hammer is perfect for this man. These are from the Tools brad set. The hand saw is from the Saw brad set. Green, orange and white pearls add just a little bit of bling. This may be a man's card but I still think the pearls add the right touch.
This card is for my husband who it a real tool man. I think he's going to get a kick out of it. I just love that no matter the theme, EO always has just the right washi tape and brads.
Hello everyone! Today I'm rolling with the Art Impressions current challenge, Get In Shape. This has been a great stretch challenge for me since my normal go-to card shape is an A2 and sometimes a 5 x 7 card. I was looking at my collection with fresh eyes and realized that the Cubbie line all include the most fun stamped shapes. Why not make a shaped card base to fit the fun cubbie stamp image? The result is an adorable little card with a ton of personality. Plus, we all know how hard masculine cards can be and this one would be right up a boy's alley! What a fun card to give to a child or friend who needs a little encouragement or has recently done something great.
Hello and happy Saturday! I'm back again to post this fabulous card featuring the new Hats Off Mr. Stamp set from Art Impressions. This set features this fine looking gentlemen and many different hats and accessories to create different themes. There are many fabulous sentiments with this set as well.
I colored my Mr. with Copic markers. I added his beard stubble, pattern in his shirt and made his socks more like athletic socks just for fun. You can color him in ways that you prefer too.
I've got a video showing how I made this card and written instructions with all the measurements are included below in this post.
Base Card Construction
In your main color, cut the following pieces. For my card, I used Basis Blue. Please note that I've used a lightweight scrap paper to make the mock up in the pictures that go with these directions. I often do this and keep it for future reference. It makes it very easy to make again this way.
1) Cut a piece measuring 9" x 5 1/2."Use a bone folder to score lines beginning on the right side at 1/2", 2 5/8", 4 3/4" and 6 7/8." If you're score board isn't wide enough for the last score, flip the cardstock around and score at 2 1/8."
Using a craft knife or a paper cutter, cut two horizontal lines between the1st and the third score lines. These lines should both be cut at 1 and 5/16" from the top and bottom edge.
Fold the card on the score lines as shown below. This is from the left to right a valley fold, mountain fold valley fold and then mountain fold. The center piece should have a mountain fold as shown in the photo below.
2) Cut another piece measuring 4 1/4" X 5 1/2.
Glue this piece to the larger card base using the 1/2" tab to join them. Using a strong adhesive is a good idea for this step.
Final Card Construction
1) Cut mats in your secondary color. I used Basis Golden Green in my card and a scrap red cardstock in the sample.
1 7/8" x 5 1/4" (2)
4" x 5 1/4" (1)
2 3/4" x 1 7/8" (2)
1 x 1 7/8" (4)
2) Cut top layers out of decorative paper. Glue to mats In the sample. This is represented by the blue polka dot paper. In my card, I used an American Crafts paper pad called Ready Set Go. Unfortunately, this pad is no longer available except on Etsy or Ebay.
3/4" x 1 5/8" (4)
1 5/8" x slightly less than 2 1/2" (2)
3 3/4" x 5" (1)
1 5/8" x 5" (2)
3) Glue the matted pieces into the card.
4) Fold the card into itself so that it looks like this.
5) Use a nested die set in any shape you like to create a focal point on the front of the card. Use glue or foam dots to attach the left side of the shape to the left side of the card, leaving the right half of the shape to overhang freely. In my card, I Basis Golden Green and a piece of grilling patterned paper from my stash. In my mock up, I used lightweight scrap in white and light blue papers.
6) Decorate as you like. I put the completed Mr. Chef on the front of my card along with navy half backed pearls.
Thanks much for stopping by today. I hope you'll go to the Art Impressions Store to check out this new set and many others that are included in the newest release.
Happy Friday! Dad's day is fast approaching and masculine cards are sometimes challenging. It's a lot easier when you use a stamp like the Art Impressions Weekend Warrior colored with Spectrum Noir markers.
This is an A2 sized card using a white card base. The designer paper for the two mats are from a Recollections paper pad. It's a travel themed pad but it has lots of masculine looking papers so I pull it out regularly when making something more manly.
Click on the image below to see the video tutorial on this card.
I know it's been a while since I posted in the blog but be sure to visit my YouTube channel. I've posted a 10 Cards 1 Kit video series you might want to check out. I used the May My Monthly Hero kit to create 10 cards that you can make using the kit and things you probably already have in your collection. Click on the photo to be taken to the video.
Have a greet weekend everyone! I hope to see you again soon, but until then keep crafting!
Hugs,
Janet
Wednesday, June 21, 2017
Hello my crafty friends! Father's Day may be over but I've still got masculine cards on the brain. This week's project is called a double-fold card and is also known as a Joyful card fold. This is a nice fold design because it starts out a normal A2 size but once opened expands to three panels and 10.25" wide.
I used many different CottageCutz die sets to create this project but if you don't have these dies, just substitute with different dies or whatever you have on hand. This same idea can work on a number of different themes. Just start by thinking about what you want to use for the closure and then go from there.
In my case, I started with the tree from the Grass, Trees & Vines set and built the rest around the outdoors theme. I also used all the dies from the stamp and die set called Woodlands. The detail in these stamps and dies are awesome. You can color these any number of ways but I chose to use my PrismaColor pencils. I colored the dies from the Fishing Gear set with distressed ink.
For complete instructions and dimensions, please visit my YouTube Channel by clicking on the video image below. As always, ask any questions you have and give me a thumbs up if you enjoy the video. If you haven't already, please subscribe so that you won't miss any future CottageCutz videos. Thank you for supporting the channel. I appreciate every one of you who follow me across any of my social media platforms.
Dies Used in This Card:
Thanks for spending some time today with me today. See you again soon!