Tea Time Birthday Box Card

Hello friends. There's a lot of trendy things going on in the card crafting world and box cards are definitely one of the hottest. This project is a really clever box card from SVGCuts called simply, Box Cards. It has 5 different cards in the set and they are all super creative and fun. One of the neat things about box cards besides the fantastic 3D dimension they provide is that they collapse and fold flat for mailing.

SVGCuts sells the set and you can cut out the pieces using any electronic die cut machine that can interpret .svg files. I chose to use my Silhouette Portrait machine to import the card pieces and cut them. I saved some assembly time by tracing, printing, and then cutting the tea pot, cups, serving tray and flower vase that's included in the set as printable elements. I decided to cut out individual flowers out of cream pearlized card stock and used pastel chalks to color the flowers light purple, blue and pink. I layered these above the flower vase to give the flowers a more realistic feeling. The card base is a peach card stock. I used more pearlized cream paper as panels on the the exterior but I embossed them before gluing them to the base to give added dimension. Embossing folders are the bomb! You can get so much more mileage out of plain card stock and the embossing can add a lot to the mood of a project.
For a little bling, I added mini metallic sequins on the flower centers. On the exterior flaps, I used a mini floral patterned paper. I inked the edges of these and the sentiment with some distress ink before I glued them in place. Here I added chocolate sequins with green metallic mini flower sequins to each pearlized cream flower. As a final touch, I added two bright gold holographic butterfly sequins to the sentiment. All in all, this went together quickly and turned out great!
Thanks for spending some time with me. Next up will be a shaker card that I had a lot of fun creating. Until next time, happy crafting!
-Janet

Contest Entries:
Craftin Desert Divas #47
DL Art January Linky Challenge
Cute Card Thursday #358
Cardz TV 3D Challenge
Simon Says Stamp - Anything Goes

Love Card - Hip Kit Club

Hello everyone! Wow! It's been a while since I posted. It's been pretty busy in my world lately and before I knew it, more than a week had passed since my last entry. I have been crafting and making a few cards just the same but just didn't get around to sharing anything. Hopefully I'll be back to my normal posting activity now.

Today's project is another card. Valentine's Day is coming and this is a card you could give to anyone you love. This collage-style card is stepping a little bit out of my typical style but I was inspired by all the goodies that came in my January Hip Kit Scrap Booking kit. It all matches and because of that it went together really easily and looks great without it being too much.

I started with a white card stock base and added two papers from the kit club. The tag was plain except for the saying on it so I embellished it with a puffy butterfly, heart and pink border. The flower is an acetate graphic which I really like using instead of a sticker for a change.
The dream word was in the kit in plain white. I had a lot of fun adding the coloring to it. I just dabbed green, pink and red stamp pads on my craft mat, spritzed it with some water and then I dipped the word in it. The result is a random but pretty marble effect. After that dried, I applied Glossy Accents to it which when dry, gives a shiny acrylic finish that is thick and accentuates the colors underneath even more. I was really happy with how that turned out. I'm definitely going to use that technique more often and may post a how-to on it at a later time.
There are a few things on this card that didn't come with the kit. They are the large flower, the pink velvet ribbon and charm and the pearl flourish. I've had those things in my stash for a long time so it was great to find that they matched the colors of the Hip Kit items so well.

I hope you enjoyed this card and that it inspires you to try some cards of your own. Until next time, happy crafting!

-   Janet

Sweetheart Cafe Box

Hope the week is treating you well. It's hump day so let's give a woot! woot! Tonight's project is a cute little valentine box. The finished box measures 7" high x 6.5" wide. It's the perfect size for something special for that special someone!


This was cut using a variety of Cricut cartridges on my Explore. To start I chose a box from the Sweet Tooth Box cartridge called House Box. I cut this as large as it would fit on my 12 x 12 mat in pink card stock and the roof in a coordinated patterned card stock. Included with this cut are window frames, window boxes and bushes for the front and sides. I chose not to cut the actual windows from the box but I glued paper behind the window frames to give the illusion windows. This way, the box doesn't lose it's strength. I measured the front wall of the box and cut a coordinating pink polka dot rectangle to fit. I embossed this before I glued it to the front.

The table and the couple are cut from the Sweethearts cartridge. It's called Date Night. The cute little topiary trees are from the Bloom Lite cartridge. It's called Tree3. I cut the frame and tag from the Artiste Cartridge.

Once the cuts were done, I finished assembling the box and decorated it. The pink flowers on the trees are Tulip beads in a bottle. The sentiment and hearts on the roof are from Close To My Heart - Mad About You - S1112. I embossed the sentiment with ZING red glitter embossing powder and stamped and cut out 8 hearts from the stamp set and glued them overlapping on the roof. This was easy because the hearts were shapes included in the Artiste cartridge. Pink velvet ribbon is glued to the roof which helps with the canopy illusion.

This one turned out real cute! If you have any questions on how to make it, I'm happy to answer them.

By the way, I've had a number of new subscribers this month and I thank all of you! It's so exciting to see readership increase. Make sure you comment on the Blog Candy page so I can put you into the drawing at the end of February. Go here to enter your name for the $20 Amazon gift card. If someone subscribes that you referred to me and mentions your name, you'll get two extra entries so please send you friends my way.

Thanks and until next time.....happy crafting!

- Janet

ALERT! Free SVG.Cuts Christmas Kit available NOW!

Hello crafty people! I was just alerted that there is a FREE SVG.Cuts.com kit

Click on the link to take you to a Christmas kit called Santa's Sweets. There are 5 projects in the kit and it's normal sold for $6.99 but is currently being offered free of charge. I don't know how long it will be there so don't delay. This kit will cut on the Cricut Explore or the Silhouette machines. I got my freebie. Go get yours!

Boogie Board Fun!

Hello crafty friends! Today's post is another scrap book page. As a Christmas gift, I was given a 3-month subscription to the Hip Kit Club! I was pretty excited about that and the first box arrived earlier in the week. It didn't take me long to start creating with it.


I don't know if you've ever considered a kit club, but Hip Kits are very good kits for the money in my estimation. This kit came with supplies that aren't available at most of the common stores yet and it's fun to use new things to wet your creative appetite. This kit came with the following supplies:


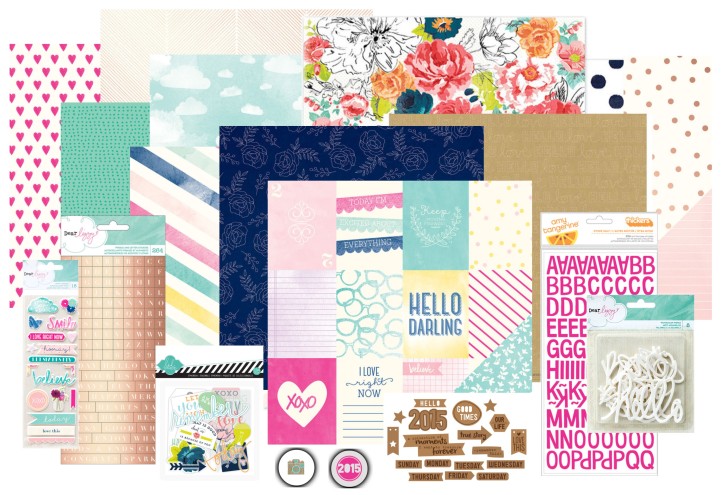
Hip Kit Club Member Price: $29.95


Products Included…

1 sheet Heidi Swapp – September Skies – Alpine Rose Paper…
1 sheet Amy Tangerine – Stitched – High Profile Paper
1 sheet Amy Tangerine – Stitched – Meadow Paper
1 sheet Amy Tangerine – Stitched – Hooked Paper
1 sheet Dear Lizzy Serendipity – Sugar Sugar Paper
1 sheet Dear Lizzy Serendipity – Good Vibes Paper
1 sheet Dear Lizzy Serendipity – Very Vanilla Paper
1 sheet Dear Lizzy Serendipity – Bright Blueberry Paper
1 sheet Dear Lizzy Serendipity – Hello Honey Paper
1 sheet Dear Lizzy Serendipity – Lucky Love Paper
1 package Dear Lizzy Serendipity – Gold Metallic Alphabet and Word Stickers
1 package Dear Lizzy Serendipity – Puffy Stickers
1 package Heidi Swapp – September Skies Ephemera
1 package Amy Tangerine – Plus One – Other Half Taffy Thickers
1 package Dear Lizzy Serendipity – Watercolor Die Cut Words
1 package Elle’s Studio – Hello 2015 – Die Cut Cork Shapes
2 exclusive flair buttons designed for HKC by A Flair for Buttons


So on to my project. I'm always about 2 years behind real time so now I'm working on 2012 mostly but also finishing up some random pages in 2010 and 2011 along with an occasional current year page. This photo of my son was one of my faves for the year. He was so enjoying boogie boarding on a Myrtle Beach, SC vacation. It was a new experience for him and he caught on to it right away. Everything I used here was from the January Hip Kit except for the three glitter brads and a crayola marker I used to spritz the two corners of the cloud paper with my Crayola Marker Airbrush. I altered one of the watercolor die cut words with blue glitter embossing powder as well. I was at first a little challenged with attaching the clear acetate words and arrows. I tried first the Xyron machine and that failed miserably because it showed through bad and looked dirty. So I cleaned all that adhesive off with Goo Gone and went to cutting mini-glue dots in half so they were small enough to fit behind the smallest printed elements. You can still see the glue if you look hard on some of them but that's ok. I was happy with the results. For the day phrase under Best Ever, I altered the actual word which was everyday. Don't ever be afraid to alter something to better fit your need like this.


Hope you enjoyed today's project. Until next time, happy crafting!


- Janet

Challenges:

Craftin Desert Divas Linky Challenge - Blue and White

Little Scrap Pieces - Anything Goes

DL Art January Linky Challenge

Snowman Shaker Card

Hello crafty friends! Today's post is a winter shaker card. I was inspired by a couple challenges to use the colors, the snowman theme and to depict an activity in the snow. I've never done a shaker card but have intended for some time to make one. If you're not sure what a shaker card is, read on!


In the closeup below, you'll get a better idea of it. Basically, a decorative pocket is made with acetate as the top so you can see through it. Inside are beads and sequins that can move freely when shaken; thus the term shaker card.


This is a 5" x 7" card when folded. The card base is white. I cut a mat out of blue and white paper and two more mats out of a snowflake paper and from light blue card stock. I also cut out one of my new favorite Cricut images, the scalloped circle that serves as the shaker's frame. To put some finishing touches on the mats, I punched a tree border on the top of the snowflake paper and stamped a border showing kids playing in the snow on the top of the light blue card stock. Once the light blue was stamped, I ran it through a snowflake embossing folder being careful not to emboss the top where the stamp was. To finish it off a little more, I glued a piece of glittery white ribbon just below the stamped image.

To create the shaker to hold the sequins and beads, I first stamped the snowman on a piece I cut into a rough circle shape. It didn't need to be exact because the frame covers it up and gives the illusion of a perfect circle underneath. Then I used that rough circle as a guide to draw another a circle on the fun foam and drew another circle about 1/2" outside of the inner circle. From this I could cut out a foam ring which serves as a padding between the stamped bottom of the shaker and the acetate top. I cut another circle out of acetate which I recycled from some packaging. It's always good to re-purpose things right? I don't usually save "trash" unless I have a plan for it. I have a small work area and not a lot of room. Since I knew I was going to do a shaker card, I saved some packaging for this project. You could also use acetate overhead sheets from an office supply store if you wanted. Once all the pieces were ready, I created a sandwich starting with the snowman circle at the bottom. Then the foam ring was glued to the top of it. This is when I could finally add the sequins and beads inside the foam ring. Once that was in place, the shaker was sealed with the acetate on the top. The frame went on top of it all and hides all the imperfections and gives it a pretty finished look. Kind of ingenious isn't it?


At this point, I completed the assembly. I glued all the mats down and the shaker on top of the mats. The final touches were the glitter ribbon, the flower, a couple gold snowflake sequins and some enamel dots in blue and white. It still looked a little empty so I used the same stamp set to stamp JOY on white card stock and attached it with a layer of foam tape to give it dimension.


I hope you enjoyed today's card. I'll be back again soon so stay warm and happy crafting!

- Janet

SUPPLIES:
Close to My Heart - C1468 - Winter Joy
Cricut Circle Frame Shape from Lori's Garden
The Paper Studio - Embossing Folder - Snowflakes
Flower - Prima - Flower Embellishments
White Glitter Ribbon - Hobby Lobby
Misc. sequins and beads from my stash
Misc. papers from my stash
Tree Punch - Creative Memories
Fun Foam - Blue
Recycled clear plastic
Enamel Dots - Homemade

CARD CHALLENGES
FantabulousCricut
Little Scrap Pieces Show It Off Saturday - Let It Snow
Craftin Desert Divas Linky Party
Bitten By the Bug - All Time Favorite Cricut Cut
DL Art January Linky Challenge
Robyn's Fetish Challenge #245
Cute Card Challenge #355 - What's New
Mojo Monday Challenge

You Could Win a Free Cricut Explore!

Hello! A quick post to tell any of you out there who don't currently own a Cricut Explore about a great opportunity to possibly win one. There is a Facebook group called Cricut Design Space. The admin is holding a random drawing to choose someone who is a member and does not currently own their own Explore. To join, look up the group name and request to join. This link may also take you to their page https://www.facebook.com/groups/570321816434816/

Once you've joined, follow the directions in the Admin's post. Her name is Dewana Curry Rohl. This is a good opportunity because most of the group already owns an Explore and that's why they are part of the group. The word will get out but the drawing pool will likely be smaller than most drawings for something of similar value. The group itself is a good resource to follow for tips and inspiration. Tons of projects get posted and it's fun to see what others are doing with their machine. If you join, I hope you win!!

A Copy of the Announcement in the Cricut Design Space Group Feed:
Dewana Curry Rohl
3 hrs
****For those who do NOT own an Explore****
I personally have a never used, never opened Explore to give away!!
Every month I like to do "a pay it forward" this is my first one of 2015! I would like to give it to someone who currently does not own one. Please be honest, it will save me a great deal of time. There are ways to fact check this, just sayn'! LOL.
This is JUST for those who do not own one, you cannot enter to give it to someone you know who doesn't have one. It will go to someone in THIS group who doesn't own one.
I will do a random draw on February 12th for all of those who post below. I would like to hear why you want an Explore and what has held you back from purchasing one already.
GOOD LUCK!

Birthday Bear!

Happy New Year! Wow! It's amazing that it's 2015. Did you know that this is the year that the movie Back to the Future was set in?? The future is now!


Before I get into my project today, I just want to point out that I have revamped my blog theme over the holiday. I hope you like it as much as I do! I'll be updating my Facebook page to match over the next week or two. I'm looking forward to a fresh look as the New Year begins and I'm excited about what 2015 will bring! One of my plans is to open an on-line shop which will allow me to sell some of my projects or provide custom orders. Likely I will open an Etsy shop and possibly also add a shop on the Facebook page. I will let you know as I move forward with any of the plans running around in my head. 


Now for today's project. This is made with something new (the cloud embossing folder for the mat) and something old (the sequins on his hat). I cut the shapes for these cards on my Silhouette Portrait. I made a birthday party invitation and a matching thank you card. They were made with no one in mind although I did use my cute little granddaughter's name on it. It is a practice run and one of the sets I'll likely put in the shop if I ever get that far. This was a lot of fun to do. They are 4.25" x 5.5" and use an image from PPbN designs. Although it doesn't show up that well, the blue plaid mat has been embossed with a cloud background.The balloon string is embroidery thread and the enamel dots in the corner are from the Candy Shoppe by Queen & Co. I pick these up at AC Moore. You can get them in many colors and 24 of varying sizes come on a card for $1. Not bad for enamel dots, especially when you can use a % of regular price coupon that is fairly regularly offered.

You know, sometimes the things I'm working on start speaking to me (and it doesn't always happen at midnight when I can't see straight and begin to hallucinate)! This little bear was begging me for googly eyes so I had to make him happy. Who am I to deny what the bear wants?! Ha, ha! The sequins on the top of his hat came from my husband's Grandmother Rose's large sequin stash that I was lucky enough to get after she passed on many years ago. It's gratifying to use her sequins on projects and I've been using them a lot lately! There are many unusual shapes and sizes which have been a lot of fun to put to use. I know she'd be happy about that. 

Well, thanks for stopping by and we'll see you again soon. Until then, happy crafting!

- Janet

CONTEST ENTRIES: