Today I have a pair of cards that were made with paper piecing dies using several colorful Pop Tone cardstocks. Paper piecing popularity is a trend that has come and go over time and it's making a strong comeback again this year. It results in beautiful textured and layered pieces.
Success with paper piecing comes with a little patience and good cardstock. Pop Tone cardstock carried by CutCardStock is a perfect paper piecing cardstock because it comes in many beautiful colors and is the perfect weight for this technique. It accepts markers, light water coloring and inks without deteriorating. Its solid core color and smooth surface makes it a pleasure to cut and shade. These are all necessary cardstock characteristics for successful paper piecing.
I chose two dies and 7 colors of Pop Tone cardstock for my card images: Sweet Tooth, Limeade, Wild Cherry, Tangy Orange, Banana Split, Pink Lemonade, Grape Jelly. Are you hungry yet? The line has such yummy sounding names! As great as that is, there's so much more to choose from with 24 different color options.
I prefer to cut a paper piecing die out of each color of cardstock so that I have a full pallet of color choices available. Tip: I will color white pieces with a marker if I don't have quite the shade I want available or if there are only a few small pieces needed in a color. I always keep extra pieces not used in the die packaging for the future. This comes in handy the next time the die is used.
Good organization is key to paper piecing because the number of pieces can become overwhelming to manage if you allow them to be mixed together. Tip: Once cut, I like to store them by color in a small spice bowl. This makes it easy to keep the colors separate and pull colors I need as I'm piecing. A tweezers can really come in handy when piecing because some of the shapes can be too tiny to handle with your fingers.
I enjoy adding shading and other details to the pieces. I used Tombow Dual brush markers and a blending marker to do this on my cuts today. Once finished, I arrange the die cut following the illustrations on the die packaging. I also use foam tape to create layering and dimension. Usually there's enough pieces left over to create another image which is what I did here. I'll use this bird and flowers on another card soon.
Once the images were pieced, I placed them on a fancy shape cut from Classic Linen White Pearl cardstock in white. The word Hello was cut 6 times and each have 3 layers to form a thick word. I ran two pieces of Rinea paper through a Sizzix Texture Fades embossing folder and placed them on card bases made from additional Pop Tones cardstock before arranging the finished pieced images on the card front. I added a narrow flag sentiment cut from additional PopTone Sweet Tooth cardstock to each card. These were heat embossed with black fine detail embossing powder.If you are interested in trying paper piecing or bringing out some older dies you have in your stash for this technique, make sure you start with quality cardstock so that you have a great experience putting them together. You cannot go wrong by checking out the CutCardStock line of Pop Tone. It's reasonably priced and great quality. Best of all, it's on sale this month!
Love the look of glitter but can't stand the mess? I know the feeling. I am a bit of a neat freak and for years I stayed away from glitter even though I loved the shine it created. Fortunately today there are quality card stocks and papers available that will give you that glitter fix without the pain.
Hello everyone and welcome! I'm here today with a delicate botanical mother's day card. I like the mix of hard black and white with all the soft pastels that frame the Mom tag sentiment. Perhaps I should have chosen a slightly more muted yellow ribbon but in person it isn't as bright as the photo shows here.
My flowers and greenery are all from the new Botanical Garden 1 die that is part of the CottageCutz Llamas and Botanicals release.
Rather than color the flowers with markers, I used white panels that I first covered in blended distressed oxide inks, splattered with water to create additional texture, and then sprayed with gold glimmer spray. These panels of color created a really special array of flowers for the card. I raised the card front with the wide black frame up on foam tape to create a window which was a perfect base to arrange all the individual flower die cuts. I used the versatile Mail Tag die to use as the sentiment to tell Mom just how much she's loved.
The video shows how I created the panels, how the individual flowers go together and how I created the card front with the framed and raised front panel. You can watch the video by clicking HERE or clicking on the thumbnail below.
Thanks for stopping by. I have you are having a wonderful day!
Hugs,
Janet
Good morning! I hope the week has been treating you well so far. Today I'm sharing a couple projects made with three dies from the new Llamas and Botanicals collection from CottageCutz. This release contains thirteen new dies full of llamas, cacti and beautiful traditional birds and fauna. If you haven't noticed, Llamas, cacti and desert images are very popular right now and of course The Scrapping Cottage has lived up to the challenge with some adorable images in that theme in this release. Please check all the new dies out at the store. They are 25% off for a limited time so head on over to make your selections if you love llamas and the desert trends!
There are many beautiful traditional bird and fauna dies too in this collection so there's sure to be something you like. In fact, here is a card I made for the CottageCutz blog that features the traditional Dogwood branch. I used watercolor and shaped the flowers and leaves. I cut a window in the front of the A2 sized card and placed the die cut on the plain white card stock inside. I like the dramatic difference in colors. It sorta makes my heart skip a beat the same way it does when I notice the first flowers of the season bloom in all their glory!
So getting back to the llama, I chose to feature the Traveling Llama die with all his luggage and cute jaunty hat at the top of his load. I can't say I understand the llama trend completely but I can tell you I've fallen in love with this little character. He is so cute and detailed with all his colorful bags, saddle and harnesses. I want to reach out and give him a hug!
To give the llama more dimension I put a layer of foam tape under his saddle and the three bags. The middle blue case is on two layers of foam tape which gives the impression that it provides a platform for the final bag. To give him motion, I used an action wobble so that he trots as he goes on his merry way. He's a traveling llama after all!
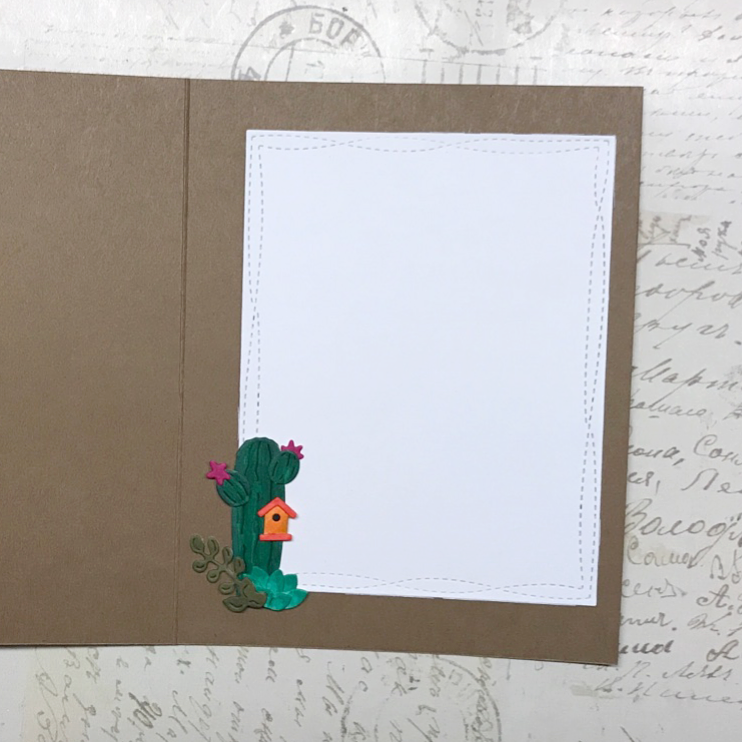
To enhance the desert look, I used the Potted Cactus die cuts on both the front and inside of the card for extra fun. The cactus images are also very cute and easy to put together. I chose not to use the pots for them since the idea was that the llama was traveling and that means cactus in the ground, not in pots.
Please visit the CottageCutz YouTube channel to see this little llama in action! I show the coloring and how to piece these dies together which is helpful if you're not sure where all the pieces go. You can either click on THIS LINK or click on the video thumbnail below.
Hello everyone! Today I'm celebrating the peace of Easter with this soft card dedicated to Christ during this holy season. No matter what your religion is or isn't, I wish you peace and love every day but especially during this special time of the year.
Thank you for visiting! I appreciate each and every one of you and hope you are having a great day.
Click on the photo below to go to the video or the DIRECT LINK.
This project was made with the following supplies:
1) Ornate Cross Die - CottageCutz
http://www.scrappingcottage.com/cottagecutzornatecross4x4pre-order.aspx
Hello crafty friends! Today I'm sharing a CAS (Clean & Simple) card featuring dies from the new Rise & Shine Collection and the Spring Collection. Before I forget, did you know that the Rise & Shine Collection is on sale for 25% off? Here’s the link to check out all the great breakfast and food related dies in this release: Rise & Shine Collection
So back to my card. When I first saw the Rise & Shine Collection, I was immediately attracted to the strong and colorful graphic in the Rise & Shine Phrase die. It’s big, it’s bold and it’s such a beautiful classic graphic image. I have used it today to make a hello card that will tell someone special I’m thinking about them. Since it has a farm theme, I kept the colors simple: green, craft, white, blue, red, with highlights of yellow and orange. I found that the Oval Doily and Frame die was a perfect backdrop to the die. Inside, I used the craft doily portion as the mat for the wonderful one cut Butterfly Hello die.
Today’s video is a short tutorial to show you how this card is made. I hope you’ll visit and let me know what you think. Just click on the thumbnail below or on this direct link to watch: Video Link
Thanks for checking out today’s project. It’s always fun to be here with you. -Janet
Hi everyone! I'm really excited to kick off the CottageCutz Easter hop. We have so many great projects to show you and so many great prizes are up for grabs! I've included photos here of the projects. I am posting videos with two project on my SugarShine Channel and three projects for the CottageCutz channel on Friday.
Join us and get some great ideas and an opportunity to win prizes from each designer including two $25 gift certificates from our sponsor, Scrapping Cottage.
Half the videos will be release today, Friday, March 16th and the other half on Saturday, March 17th. To qualify for the prizes, you must watch, comment and subscribe to each channel. There are two videos on the CottageCutz channel so be sure to comment on each of them as well.
You can enter through March 23rd. The winner videos will be posted by all the designers on Friday March 30th. This gives us a week to verify the subscribers from all the channels who commented and qualify to be in the drawings.
Here are the links for all the project videos:
**************IMPORTANT DATES******************
MARCH 16-23rd: Period when hop is open. Watch, comment & subscribe to qualify to be in the drawings from each designer and two $25 gift certificates from our sponsor, Scrapping Cottage
MARCH 30: Winner videos for each channel will be posted. Visit each to find out if you won.
BEST OF LUCK!!!!!
Winners will be announced on MARCH 30th. This will give us enough time to verify all the people who followed the rules and can be included in the drawing.
For all the dies featured, please visit ScrappingCottage.com
Thanks for visiting me and joining in on our hop. I'm grateful and humbled by your loyal support.
Hi everyone! Today I'm here to show you a set of thank you cards for the spring season. I have really enjoyed working with the dies in the new CottageCutz In Stitches collection. There is so much to choose from and they can be used year around. I am a huge fan of the stitched look so these are right up my ally!
Today's set of five cards feature the delicious Stitched Fruit dies. Here you will find a lemon, apple, pear, strawberry and cherries. These are nice sized dies when assembled and were perfect as the focal points for my card set. They would be awesome on tags also. I have to say I kept thinking about slot machines when I was working with them since they are the fruits found in the traditional slots. But I digress. LOL!
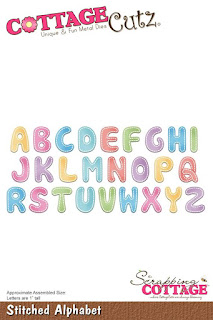
The Thanks sentiment is cut from the Stitched Alphabet set. The entire alphabet cuts out at once and are a nice chunky size at 1" tall for words or short phrases on your card projects. The letters would also work wonderfully on your scrapbook layouts. There are matching numbers to match the letters although I didn't use them in today's project.
The circle die cut comes from one of my most favorite shape sets, Nested Wacky Stitched Circle Set. To create a little additional interest, I trimmed about 3/8" of the circle off and butt it against a narrow green strip and a red embossed strip of card stock.
Please click on the video thumbnail below or this link to watch how these cards were created.
Thanks for stopping by to get some inspiration for your projects. Have a crafty day!
Hello and Happy Valentines Day! I'm here again with another video tutorial for CottageCutz. This time I'm showing off one of the largest dies in the new Spring 2018 Release called Fresh Spring Floral.
This is a pretty simple A2 card base in black card stock. The black background makes the pastel colors in the wreath pop. The white frame was created with an embossing pen and white embossing powder. The raised glossy frame gives it an almost nostalgic look, like the old fashioned photo albums with white writing. The Grateful Expressions Plus sentiment is cut from textured red foil card stock to add a little glamour without competing with the wreath.
I hope you'll take a few minutes to watch the card construction tutorial. As always, just click on the YouTube thumbnail below. If you have trouble using the thumbnail, you can also follow this link directly: Fresh Floral Gratitude Video Tutorial
Hi everyone and hope you're having a great week so far! I am showing off the Happy Mail I received from the Scrapping Cottage this week. It's the dies I ordered from the Spring and In Stitches releases that just arrived and I am super excited to share them with you!
Now, I'm always a fan of all things CottageCutz but I have to say that this release is even more wonderful than normal. The Easter and Spring themes in the release are so cute and fun! CottageCutz does animals better than anyone and you'll not be disappointed in the little critters in this release! The bunnies and chicks are adorable! There are also butterflies, eggs, flowers and scenes that will seriously get your creativity flowing. Just a few of these darlings are shown in the picture below.
The In Stitches collection included in this release are 12 images outlined and accented with stitches. You'll find fruit, flowers, bees, an owl and bird, sewing notions, mushrooms, a new sun, cloud and umbrella set, canning jars and best of all, a set of letters and numbers!
These dies are are available now and are currently 25% off. Get them while you can because I suspect some of these will sell out. Click here to go to their store.
Click on the video link below to see the dies I picked up. I hope you enjoy it. If you have trouble accessing the link, you can click here: Release Video
Thanks for spending a few minutes here today. I'll be back soon!
Hello everyone! It's Janet here for my first post of the new year. January has certainly started with a cold slap in the face for many. It's been rough but I don't mind having an extra excuse for hibernating in my craft nook! How about you?
I'm detouring from my normal video tutorial to show you a loaded envelope I created using a winter theme. I have long admired the beautiful and complex looking loaded envelopes that many in the crafting world have shown off. I finally took the plunge and made one myself and I really had fun with it. I honestly was skeptical when people said they found making loaded envelopes relaxing but I have to admit that I found it therapeutic. I created as I went with little more than the basics planned before I started. First I picked a theme (winter) and then chose dies I thought fit the theme. I picked a color scheme and made the empty envelope with paper stock that worked. Then I set about cutting pieces for the project, coloring and piecing them. Finally, I looked at all the pieces I had and started creating the elements that would ultimately load the envelope. Many of the items I made are featured in the photos below.
In the end I created cards, flowers, snowflakes, various clips with snowflakes and deer, rosette wands, gift card holders and several pockets and tags for my loaded envelope. I have a few extra pieces left over but I will be able to use them in future projects. I'm not sure how others approach making the items that will go into their envelopes but this method worked great for me. I had a lot of fun letting the pieces tell me what to do with them. I certainly encourage you to give it a try!
To see all the parts and pieces and learn what dies I used, please click on the video thumbnail below.
Thanks for visiting today. Stay warm and safe!
- Janet