Do you like to learn a new card style once in a while? I do and I'm especially a fan of 3D style fancy card folds. I'm always scouring Pinterest and Facebook for great ideas. I'm sharing one with you today I think is a lot of fun. It's part swing, part frame and it doesn't open like a normal card. Instead it gives a lovely 3D view of a frame and a peak at something hanging inside with the frame.
Thanks for joining me here for some cards I did for Eyelet Outlet. Looking for a quick and simple card design? I've got one here for you today that lets Washi Tape do all the hard work. Don't have Washi Tape or want a new design or two? Eyelet Outlet has hundreds of designs at their STORE. You're sure to find designs that you'd love to own.
This is a great way to personalize a card for the recipient's hobbies or interests. It can instantly make a card feminine, masculine, whimsical, serious, juvenile or adult. Best of all, it's a quick but great card you can make when time is tight.
Here's a close-up of the bee card.
Let's take a peak inside the map card to show how I put another piece of white card stock inside with a strip of matching Washi Tape at the bottom. I sometimes also put a brad in the inside to accent the Washi Tape like here where I used the Anchor Brad in antique bronze. There are two other finished in this charming pack including shiny silver and pewter.
I like using Washi Tape on envelopes because it ties the whole look together and makes a great presentation when it's delivered to the recipient. I put it on the closer flap of each envelope and turn the excess Washi Tape to the back of it.
Stop by my YouTube Channel to see close ups of the cards and a tutorial with all the measurements. While you're there, like it and subscribe so you don't miss any new content. Click on the photo below to see the video or you can use this link: https://youtu.be/FC6ogdBv4uY
Are you inspired to try some of these yourself? Let me know what you think!
Do you like pirates? My husband loves the pirate theme so I decided to make him a card fit for the best pirate I know! Arghh!
I'll admit, this took some time because of the stamping and coloring but I know he'll love it so it's all good! The fancy fold base card is not hard and very quick to make so you can always simplify it and still get a great card.
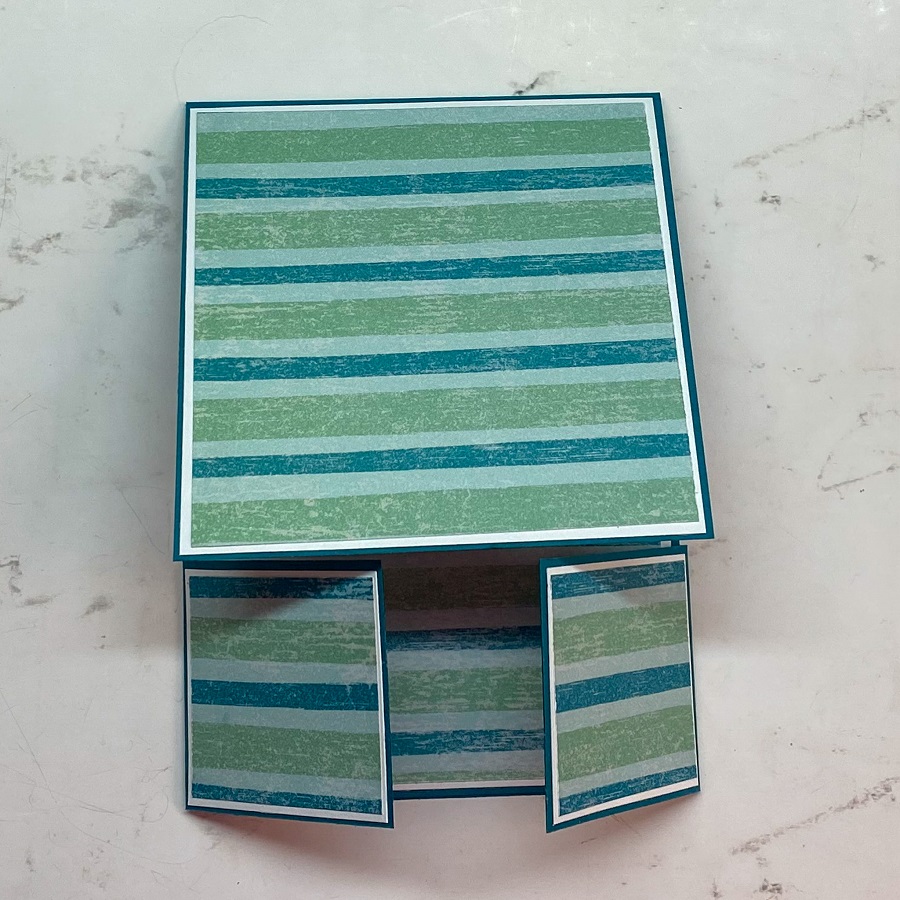
The card base is a fancy fold style called Dutch Door because of the two flaps at the bottom that meet in the middle and the flap for the top section. When displayed, the card front rests on the flaps and it turns into a sweet easel card. This is digressing a little but I was a child in the 70's and I thought Dutch doors were the bomb back then! It was fun to think of that while I was making this one.
I used three brad sets from Eyelet Outlet in this card. They were perfect pieces to enhance and make this card extra special!
All the card stock used comes from CutCardstock. The card base is made with Basis Teal card stock. It's the perfect weight (80 lb) as sturdiness is important for this fold. You can't go wrong with teal for a nautical card because navy, gold, brown, pink and coral looks great with it and they happen to be common colors for nautical images.
The pieces needed for these cards are: Basis Teal Card Stock:
Main card base - 4 1/8" x 10" Score at 5 7/8"
Flap for the doors - 2" x 8 1/2" Score on each end 2 1/8"
Designer Paper of Your Choice: Front Flap - 3 7/8" x 3 7/8" Inside of Card - 5 5/8" x 3 7/8" 2 pieces for the door fronts - 1 3/4" x 1 7/8"
You'll also need several pieces of white card stock for mats. I used Neenah Classic Crest Solar White. This card stock is well known by Copic colorists and is a favorite for coloring images. I used it for all the stamped images in this card.
Front flap mat - 4" x 4"
Inside mat - 5 3/4" x 4"
For outside and inside door mats: 1 7/8" x 2"
Front image and sentiment - approximately 2 1/4" x 3 1/2" (cut with a steel stitched rectangle die) Inside image and sentiment - approximate 2 1/4" x 3 1/2" (cut with a steel stitched rectangle die)
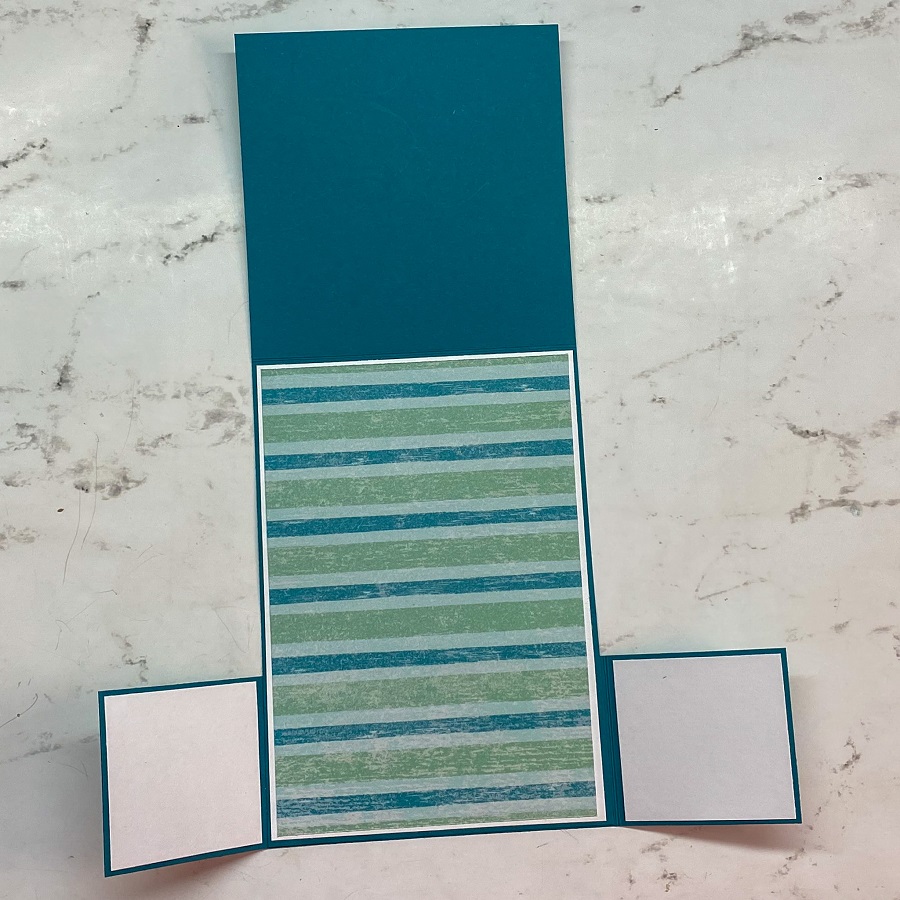
Attach the smaller teal card stock piece to the back of the larger piece with glue so you can close the door flaps at the bottom of the card. Glue the mats and designer paper to the outside and the inside of the card.
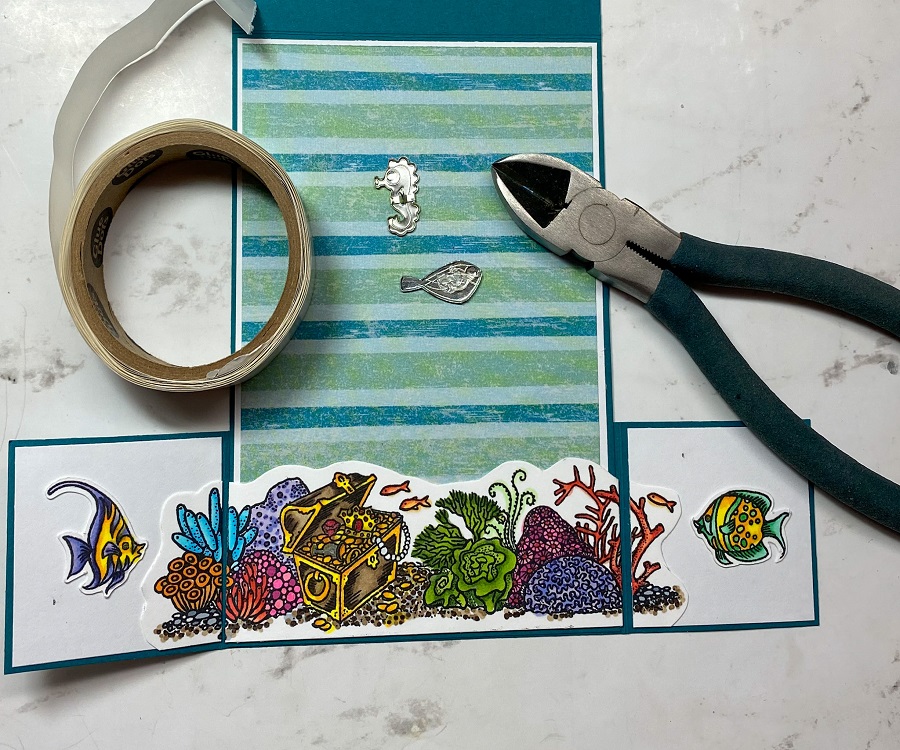
Next I stamped and colored Me Matey, the fish and the treasure chest sea bottom image. You'll see in the photos that I used yellow initially to make the sentiment glow but I didn't like it. Shall we say it reminded me of small children in a pool doing what kids do in a pool? Not good! I used a light turquoise marker and went over it. That's why the finished pictures show turquoise around the sentiment instead. The yellow was light so it was no problem going over it.
I cut the fish out using my Brother ScanNCut and trimmed the chest scene with my scissors. You can easily fussy cut all the pieces but I'm lazy! Haha! I glued these to the inside of the card and prepared the Funky Fish Brads to go into the scene. I was so busy constructing the card, I forgot to put the brads in before I glued the mats down. Since I didn't want the brad prongs to show, I just cut off the prongs and used glue dots to adhere the decorative part of the brad to the card. Problem solved!Then I stamped and colored the interior lady pirate and stamped the Father's Day message. I adhered everything inside the card and also added a strip of Fancy Pearl and Jewels Bling in blue from Eyelet Outlet. It reminded me of air bubbles and was a perfect touch the vibe I was going for! Here you can see how I placed the Funky Fish in the watery scene.
To finish the front of the card, I attached the male pirate image to a gold mat cut from Mirrisparkle Gold Glitter card stock at approximately 3" x 4 1/4." I embellished the mat with a Compass Brad. I think you'll agree that gold is gorgeous on teal! The matted image was then glued so the bottom is about an 3/4" below the flap. This creates the notch that holds the doors open when you display it.
The front flaps are decorated with sand dollars and starfish from the Sea Shore Brad Set. The pirate stamps are from Jessica Lynn Originals called Pirate Brentwood Owl. The fish and treasure chest scene is from a Stampendous set called Nautical Treasure.
As you can see, this card folds flat for mailing or giving. I really love this fancy fold. It's an easy way to jazz things up a little.
This card can be adapted to any occasion, season or reason! Use your imagination, grab your favorite CutCardStock card stock and brads and bling from Eyelet Outlet and get creative! Thanks for stopping by.
Janet
These are the products I wouldn't be caught on a desert island without!
NOTICE: There are affiliate links in my posts. If you shop for supplies through my links, I will receive a small commission which I use to support my crafty purchases to show you, my followers. There is never any charge to you and I only link up to products I myself use and love. I greatly thank you for the support to keep me going 'cause you all know this hobby ain't cheap! LOL!
Welcome to my post for CutCardStock's DIY Wedding Hop! Before we get into the projects, I want to be sure you know that by leaving a comment here on this post and all the other participant's blog posts, you qualify for the drawing to win a $40 gift card from CutCardstock! The winner for this will be announced on Monday, May 11th on the CutCardStock Blog so make sure you check back there for the winner announcement in a couple of days. We would love to see your projects to link up one of yours made with CutCardStock products. Any theme is welcome! A blog list can be found at the end of this post. The next stop is Leslie Turner.
I am giving away a separate giveaway (not affiliated or sponsored by CutCardStock) which is a pack of 30 Cricut Fine Line Markers. To qualify for that, please go to my channel for my project share and tutorial and comment. I will pick a winner from my subscribers who leave a comment and will announce a winner's name on Saturday, May 16th.
The video has much more information and a tutorial to make the pillow box favor. To access the video, click on the thumbnail below or this LINK:
My projects showcase just a few of the beautiful CutCardStockpapers and card stocks that are so appropriate for weddings. First up is a faux wood sign cut out of Savannah White Limba Woodgraincardstock. This is a lovely, heavily woodgrain embossed cardstock. Cutting this on my Cricut was very easy and the construction of the sign is simple as well.
The basic Wood Sign Pattern(undecorated) comes from My Scrap Chick. It comes with beverage related printables but I chose to make my own decorations. Construction instruction on their site for it. You can see some of their examples below. This sign could be used in dozens of ways from a table centerpiece, a table number identifier, a food sign, announcing the same of the couple, as decorations in the cake display, bar and so on. The options are practically limitless.
On the other side I created a wedding scene using two other Cottage Cutz Die Cuts: Bride and Groomand Trellis w/Vines. I cut the trellis out of more Limba Woodgrain and used markers to color the flowers and vines. The couple is cut out of Curious Metallic Pale Aloe. A pretty Prima roseaccents this side.
My second project is a simple pillow box thank you favor. These would be lovely in a basket or included in a place setting as thank you mementos to the guests. The file is from the Silhouette Design Store and it's called Wedding Ring Pillow Box by Pebbles In My Pocket (photo from the store below).
I cut mine on my Cricut Explore Air since a .SVG file is included in the purchase. I made one each in Curious Metallic Cardstocks, Pale Aloe and Pink Quartz. These give the box such an elegant look. They are economical to make since you can get several out of each card stock sheet and they won't break your bank when filling them with a sweet treat. M and M's or candied almonds would be perfect for these little boxes. The treats won't fall out because the window is covered with a small piece of acetate, just 1 3/4" square. A few inches of 1/4"Scor-Tape is all that's needed to secure it in the pillow shape. Additionally, small dabs of adhesive will secure the gold ring made of Mirrisparkle Gold Cardstock. The diamond is made of CutCardsStock Silver Glitter Paper. I used the flag included in the file and drew a different Cricut Thank You sentiment using a Gray fine tipped Cricut pen. Then that is secured across the middle of the window with a glue dot on each side.
I hope you like these projects. Be sure to keep the ideas coming and go to the next stop: Leslie Turner. Leave a comment at each blog and leave a comment or upload a wedding CutCardStockproject of your own at the CutCardStock blog to qualify for their $40 gift card. And last, don't forget also to go to my YouTube video and leave a comment there for the Cricut Pen prize.
NOTICE: There are affiliate links in my posts. If you shop for supplies through my links, I will receive a small commission which I use to support my crafty purchases to show you, my followers. There is never any charge to you and I only link up to products I myself use and love. I greatly thank you for the support to keep me going 'cause you all know this hobby ain't cheap! LOL!