Showing posts with label Easter. Show all posts

Spring Rabbit Globe


  Easter is just around the corner. Next to Christmas cards, Easter is the next big card holiday for me. After a long hard winter, spring Easter cards are so much fun to make. They're hopeful and cheerful. It always makes me feel lighter when I make Easter and spring cards.

I made this card using an .svg pattern from Cricut Design Space. The image is called Happy Easter #M1479296E. This image is already a great card front but it is made even more awesome with brads and pearl bling from the store. It's so quick and easy to make a card go from good to great with help from Eyelet Outlet.

SHOPPING LIST:

Thanks for stopping by today. If you are thinking about making your Easter cards this year, be sure to stop by Eyelet Outlet to pick up all your card making accessories and bling!

Happy Creating Everyone!

Janet YouTube - Blog - Facebook - Instagram - Pinterest

Spring Happy Mail from CottageCutz!

Hi everyone and hope you're having a great week so far! I am showing off the Happy Mail I received from the Scrapping Cottage this week. It's the dies I ordered from the Spring and In Stitches releases that just arrived and I am super excited to share them with you!

Now, I'm always a fan of all things CottageCutz but I have to say that this release is even more wonderful than normal. The Easter and Spring themes in the release are so cute and fun! CottageCutz does animals better than anyone and you'll not be disappointed in the little critters in this release! The bunnies and chicks are adorable! There are also butterflies, eggs, flowers and scenes that will seriously get your creativity flowing. Just a few of these darlings are shown in the picture below.

The In Stitches collection included in this release are 12 images outlined and accented with stitches. You'll find fruit, flowers, bees, an owl and bird, sewing notions, mushrooms, a new sun, cloud and umbrella set, canning jars and best of all, a set of letters and numbers!
These dies are are available now and are currently 25% off. Get them while you can because I suspect some of these will sell out. Click here to go to their store.

Click on the video link below to see the dies I picked up. I hope you enjoy it. If you have trouble accessing the link, you can click here: Release Video


Thanks for spending a few minutes here today. I'll be back soon!

- Janet

Flocked Bunny - And a Fork Bow

Hello Crafty Friends! I know it's early for Easter but it's spring in a big way here in Charlotte and I can't help myself. This week's project is a cute bunny with flocking. I love using flock as a fun way to add some "fur" to animals in projects. I have great luck using double sided adhesive to get a nice finish with flock. Until I figured that out, I had given up on it because I was never satisfied with the end result. To finish it, the inside of the card is stamped with another cute little bunny and an Easter message. Although the focus of my cards are always the outside, I do try to make the inside nice too.

I suspect you'll see another flocked card for Easter sometime soon as I have a jar of the prettiest sunny yellow flock with glitter mix that I'm anxious to use. I see a cute Easter Chick in my future! I also have some tropical pink flock in my stash. I am betting it would be adorable on a pair of pink flamingos. What do you think? Should I??? Of course I should!

Another feature of this project is that I made the bow that is around the bunny's neck with a fork. Yes, I said a fork! Now maybe this was a rage that most crafters saw when it was a thing a few years ago (most videos on this are are 2-3 years old) but I just discovered it. It's really works to make a pretty double bow. I am going to try it next on a large meat fork so that I can get a larger bow. It makes the double bow super fast and easy. Check it out! Oh, and while you're there, please subscribe to my channel!


Thanks for spending some time with me and until next time, keep crafting!

CARD RECIPE:
A2 White Card Base-4.25" x 5.5"
Gray Mat-3.75" x 5"
Pink Mat-3.5" x 4.75"
Cricut Gray Rabbit-Easter 2010 Cartridge-Bunny-#M470E4-3.46" H
Cricut Easter Blessings Sentiment #M3CF00-1.49" H
Pink Ribbon
Pink Paper Flower
White Glitter Ribbon
Pearl Accent
White Iridescent Sequins
Pink Glitter Paper-DCWV Glitter Brights Stack-#
Gray Flocking Powder
Pebbles Pink Chalk
Easter Stamps - Brand Unknown
Silhouette Double Sided Adhesive Sheet
Silhouette Flocking Powder

I'm excited to share this project in these challenge blogs:
Fantabulous Cricut Blogspot Challenge #295-Sequins
Crafty Creations Challenges #335 Anything Goes
Creative Fingers Challenge Blog.blogspot Challenge #125
Die Cuttin Divas Challenge #305 Animals
Hiding In My Craftroom #290 Any Holiday
Aud Sentiments Challenge-Animals Sentiment
Crafty Gals Corner Challenges #111 Anything Goes
Jo's Scrapshack #177 Always Anything Goes
Happy Easter Shaker Card

Finished Card Front
Card Interior


I was inspired by spring weather today to make a shaker card. I recently purchased the Cricut Explore deep cut blade and used it to cut a foam frame to hold the shaker pieces inside was a good test for it. I have a Cricut image subscription for the Explore machine. I prefer to use my iPad and the Cricut app to design a card like this. It's a series of rectangles that you import and it makes it simpler to make sure that each rectangle fits the way it's supposed to.

Here's what I did. Using the Cricut Explore subscription, find the shapes you need: grass strip, chick, rabbit and egg. You can choose any shapes you like. The smaller shapes will be the confetti along with a few sequins. A frame was designed by slicing two rectangles together to form the open interior and then one strip of grass was welded to the frame. Two single grass strips are also needed. The pieces can be seen below.

Card Parts

Once this is done, design a simple rectangle foam frame the same way as the paper frame that fits underneath the card frame. The foam frame is what forms the raised frame that holds the confetti inside the shaker card. In addition to these pieces, cut a rectangle from a transparency sheet which fits between the paper frame and the foam frame. Then cut a piece of sky printed paper and stamp the Happy Easter sentiment on it.
Shaker Card before gluing the sentiment paper on top of the foam frame
To put the card together, layer the two grass strips behind the frame to create three levels of grass. Then the transparency is glued behind the frame. The foam frame is glued to the back and then the shaker pieces were added to the interior. The sky paper with the sentiment was glued on top of the foam frame so that the sentiment would appear above the grass. A green bow is attached to the front of the card frame. This finishes the shaker. The shaker was then glued on top of the card base. Finally a rectangle of white card stock was stamped with the Wishing You a Happy Easter sentiment and bunny. It was colored with Wink of Stella Glitter markers in pink and green. A pretty pastel effect with the markers is done by writing with each marker on a craft sheet and picking it up with a damp brush. This creates a soft shimmery watercolor effect.

I have really enjoyed using my Cricut Explore machine lately. They have added many materials options in the custom cut selection and it cuts like a dream. It reliably cuts just about anything at any size I ask it to cut. It's easy to design with it and the software is getting more intuitive and simple for anyone to be successful. 

Thanks for checking our my card today. I hope I've given you a few ideas of your own.

Janet

This week's card contests:

Broken Egg Easter Card

Hello again! Just a quick post to show you another of my Easter cards. This one was made using the Kiwi Lane Templates. Kiwi Lane makes scrapping and card making easy and quick. The templates are made of sheer plastic and all you do is trace, cut and glue to get a quick layout or card.

If you don't have a lot of time to scrap and you love paper, Kiwi Lane templates are for you. It takes advantage of your paper to make your embellishments without much fuss. They're very versatile too. For example, my chick is actually a template of a leaf. By adding a beak, eyes and a little wing, it's a chick! Easy peasy.

Enjoy your Easter!

Janet

BASIC SUPPLIES:
Kiwi Lane Templates:
Kiwi Lane Designs Shop
Tiny Tags 2T
Tiny Accents 2T
Nature 1
Rings 1
Close To My Heart Stamp Sentiments Just To Say Collection

Easter Egg Card

Design # 76084 - Silhouette Store

It's hard to believe it but Easter is almost here. I made several different cards this year to send out to my family. I am in a little bit of a hurry as we are preparing for a vacation and so with the cleaning, washing clothes, packing and the general nuttiness we tend to put ourselves through before we permit ourselves a break, I didn't have as much time as usual to dedicate to design. A quick look through the Silhouette Design store solved that problem by giving me several quick cards to choose from.

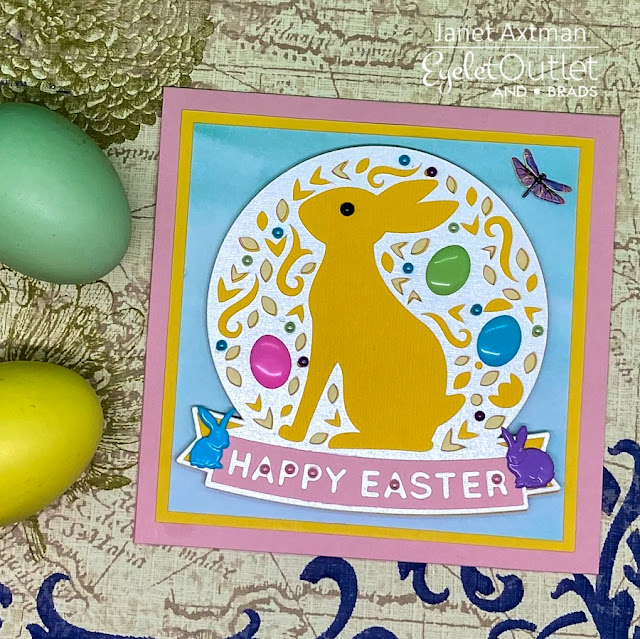
This little beauty is a 5 x 7 double bi-fold card that I picked up at the Silhouette Store from SnapDragon Snippets. It came with all the pieces and a quick trip to their web site told me how to assemble the card. It's a little hard to see here but I used blue glitter paper for the "paint" in this card and pink glitter paper for the happy Easter phrase. I'm not a huge pink fan normally but the orange and pink fluorescence of the groovy tie-dye cardstock I chose for it made the pink glitter paper a no brainer.

Also available with this card is a matching paint drip envelope. I meant to take a picture of mine but I forgot! Here is the picture from the Silhouette Store. I made mine with cloud paper and a matching blue glitter top instead of the green one shown so it would match my card. It really makes the card extra special when the envelope hints at something great inside.


I hope you and yours have a very fun family Easter this weekend. Not only is it a special time of the year, it's a yard stick to tell us that spring is not far behind. Can't wait to make more spring cards. Visions of flowers and birds are dancing around in my head! I'm sure lots of ideas are not far behind.

Take care!
Janet

BASIC SUPPLIES:
DCWV - The Tie-dyed Cardstock Stack
DCWV - Glitter Brights Cardstock Stack
Heidi Swapp 6 x 6 Paper Pad - Favorite Things (paper used for the egg background)
Scotch Quick Dry Liquid Adhesive
Ad Tech Removable Tape Runner