Happy Birthday Tool Man!


Hello crafty friends! Today I'm here with a fun masculine card featuring Eyelet Outlet brads and washi tape. I've used many different washi tapes on this card. It all works together to create a happy birthday tool man theme.

I've also added tool brads to this card. I think the wrench and hammer is perfect for this man. These are from the Tools brad set. The hand saw is from the Saw brad set. Green, orange and white pearls add just a little bit of bling. This may be a man's card but I still think the pearls add the right touch.

This card is for my husband who it a real tool man. I think he's going to get a kick out of it. I just love that no matter the theme, EO always has just the right washi tape and brads. 


Thanks for stopping by today. I hope I inspired you to do a little winter cardmaking. Have a great week!

Happy Creating Everyone!
            Janet YouTube - Blog - Facebook - Instagram - Pinterest  

Cute Farm Animal Valentines for Kids


Happy Saturday everyone! Like a lot of crafters, I've been working on Valentine cards and today I'm bringing you some cute children's valentines made with the 6 freebie stamps that were released with the second 2021 new releases from Art Impressions.

I stamped these cuties and colored them with Copic markers. Then they were fussy cut and arranged on hearts that form an off the edge valentine. The white cards and the patterned card base were cut with the Rectangle A2 Double Stitched Dies. These fit into A2 envelopes and have blank white cardstock on the back where any message can be written. 

I think grade school kids would love these for their friends. I get a chuckle out of the punny sentiments that go with each animal. I made the sentiment cards using Microsoft Word.

I know a lot of you have some or all of the freebies. I have made a video that shows how I made these. If you are curious what colors I used and see how I colored each of them, click the thumbnail.


Thanks for stopping by today. Ai has many adorable stamps to use and I hope you are having fun making your valentines!

Happy Creating!

Janet YouTube - Blog - Facebook - Instagram - Pinterest

Winter Beauty


So how's the weather been treating you? A lot of the country has had some rough weather lately and here in Charlotte we actually had snow! Woohoo! We don't get snow too often and we got some last Sunday and again Friday night. It doesn't last long here which is just how I like it. It's pretty when it comes and just as nice when it goes. 

All the cold temps and the snow inspired my card today. There are many products that can be used for a winter theme. The background of the forest is made with Glitter Winter Washi Tape. I love the subtle pattern of trees in the tape. I used two rows of Sparkle White Glitter Tape to represent the snow. Two strips of Fancy Long Bling-Pearls & Jewels in clear adds a bit more sparkle. I used a pair of Moose Brads in the scene. The Cardinal Brad is the perfect pop of color in this neutral scene. 


Thanks for stopping by today. I hope I inspired you to do a little winter cardmaking. Have a great week!

Happy Creating Everyone!


                                     Janet YouTube - Blog - Facebook - Instagram - Pinterest  

Cool As a Cumber Workout Gal


Happy Saturday everyone! Today is day 3 of the Shimmy and Shake Challenge over at the Art Impressions Blog. This challenge is right up my alley. I love making interactive cards. Today I used a Wheelie set 5095 - Workout Gal. Isn't she as cool as a cumber? I love that she's drinking wine instead of water and that she's all glammed up instead of sweated up. Wish all of us could look that good when we're getting in shape!

Perfect Card for a Boy - Hamster Wheel Cubbie Card


Hello everyone! Today I'm rolling with the Art Impressions current challenge, Get In Shape. This has been a great stretch challenge for me since my normal go-to card shape is an A2 and sometimes a 5 x 7 card. I was looking at my collection with fresh eyes and realized that the Cubbie line all include the most fun stamped shapes. Why not make a shaped card base to fit the fun cubbie stamp image? The result is an adorable little card with a ton of personality. Plus, we all know how hard masculine cards can be and this one would be right up a boy's alley! What a fun card to give to a child or friend who needs a little encouragement or has recently done something great. 

Happy Birthday Weenie!


January is an important time at my house because it's my husband's birthday month. It's a tradition that his birthday card has a doxie dog on it. It began decades ago when our fur baby was a doxie. Our beloved Tigger has been gone a long time but he is always remember during Steve's birthday. Funny how traditions begin but that's the story behind ours.

I saw this ephemera piece in a paper pad I have in my stash and of course my head danced with all kinds of way to make this really special using Eyelet Outlet brads, washi tapes and bling. I love it and I think my husband will too! It's so easy to take something good and make it great with EO embellishments.

SHOPPING LIST:

Thanks for stopping by today. Have a great week!

Happy Creating Everyone!


                                     Janet YouTube - Blog - Facebook - Instagram - Pinterest  

Why Can't I Be Queen?


Today I'm sharing another card for the Get In Shape Challenge at the Art Impressions blog. Last weekend, I posted a towel shaped card made with AiCS31 - Pamper Yourself. This weekend, I'm sharing the card I made with the other main image in this set. I also used the Ai 5063 - Rectangle Double Stitched Dies and the 5133 - Flag Double Stitched Dies for this card. Here our lady is prepared to receive her massage. What I love about her is that she knows her self worth and ponders just why it's asking too much to be treated like the queen she is!
  
The crown-shaped card base was created by enlarging an image in Cricut Design Space. The front includes all the pieces in purple, gold and mirror cardstock. Pearl and gem bling was used to decorate it. The back is a solid version of the shape. I connected the two together by scoring a horizontal line about 3/4 down from the top of the solid shape. The two pieces are glued above the score line creating a hinge for the card. You can turn any shape into a card using this method. 

I really enjoyed coloring this lady with Copic markers. I added additional fold details to the towel and light shading. A little white gel pen was used for highlights n her arm, mask and earing.

COPIC COLORS USED:
C00, C0, C1, C3, C5
BV04, BV02, BV00
YR14, YR 15, YR 18
E000, E00, E04, E11, E21, R20

Thanks so much for joining me here today. Don't forget that our current Art Impressions challenge Get in Shape is running through Wednesday of next week. A new challenge will be up on Thursday. Submit your shaped cards (no rectangles or squares) for a chance to win Ai stamps of your choice. Click on the image below to be taken to the challenge post and link up your creation.


Happy Creating!

Janet YouTube - Blog - Facebook - Instagram - Pinterest

House Mouse Birdie Kiss


Hello and happy Friday everyone! Today I'm doing a very quick card share of an adorable House Mouse Designs stamp called Birdie Kiss. I have been practicing water coloring using Tombow Dual Tip Markers. Earlier this week, I was rummaging through my stamps and came across this one. I had picked it up at Tuesday Morning in 2018 and had never used it. Well, one look and I fell in love with it again and this time I pulled it out to stamp and paint. Finally! Unfortunately, I think this stamp is discontinued but you might be able to find it on Ebay or Etsy if you really want this stamp.

I paint this by using a pallette, rubbing marker ink on to the palette and then picking it up with a damp #3 round brush. I apply the color directly from there but there are times I wet the area I'm coloring first if I want it to spread out and give more variation of color. Every time I paint something, I learn something and this was no exception. I'm far from perfect but practicing is making me more comfortable and giving me more confidence to try the next one.  

This is a 5 x 7 card. Usually I make 4 1/4 x 5 1/2 cards (A2 size) but this is such a nice large stamp, I thought it deserved a bit more real estate. I used a 5 x 7 sized Curious Metallic Violette cardstock for the background. I cut the purple mat out of the center of the 5 x 7 piece, then placed the gold metallic patterned paper from my scraps on top to cover the hole created by cutting the mat. Then I put the mat and the cut image on top of that. I glued the finished panel on a cream 5 x 7 #110 Classic Crest Natural cardstock card base. This way, I only used one sheet of 5 x 7 specialty paper and not that much was wasted.

I'm entering this card into the House-Mouse & Friends Anything Goes Monday Challenge

I'll be back again tomorrow with my regular Art Impressions project. Take care everyone!

Thanks for stopping by today. Have a great week!

Happy Creating!

Janet YouTube - Blog - Facebook - Instagram - Pinterest


So Irresistible!


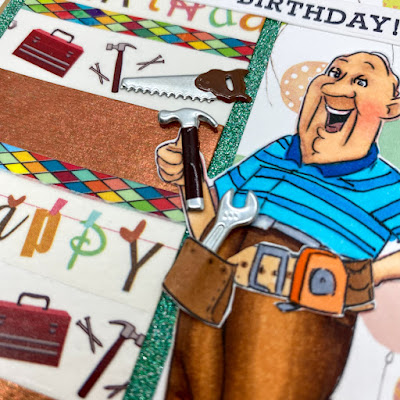
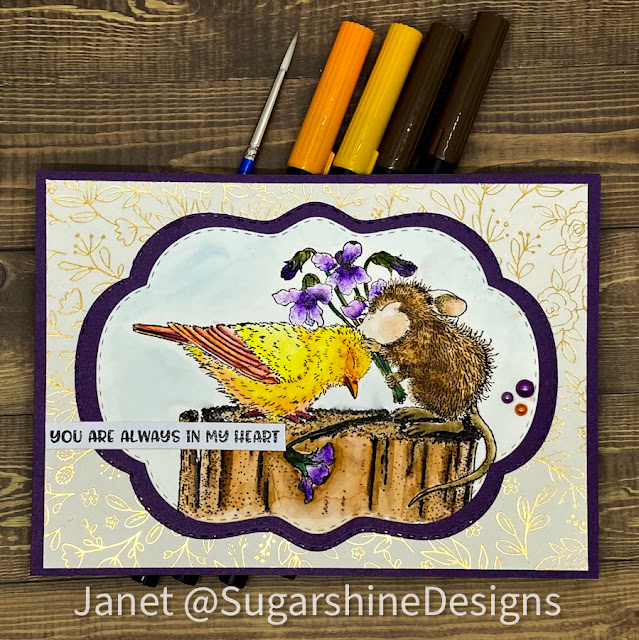
Unfortunately, I’m making a lot of get well cards lately. I decided to make lemons into lemonade by coloring up several of these cheerful cards. As they say, humor is the best medicine! I know these cards will brighten people's day when they’re received. 

This is made with the Art Impressions 4863 Irresistible Set. I really love her bed. It’s just like the antique brass bed I had when I lived at home so many years ago. I think I would have picked this one up just because of that but it also makes up some great cards with just the right amount of light heartedness.

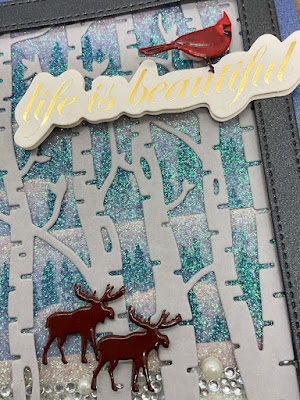
This is an A2 card that folds at the top. I used XXX in Basis cardstock. Basis is an 80# weight and I highly recommend it for it's solid core, smooth surface and beautiful colors. It's outstanding used as card bases but it also cuts wonderfully in both metal dies and on electronic cutting machines. The beautiful pink cardstock is Pink Quartz Stardream Metallic cardstock. It is so lustrous and beautiful! You can get both cardstocks at great prices at CutCardStock. If you haven't checked them out yet, you really should.  

The beautiful border on this card is from one of my new favorite rectangle nesting die sets from Spellbinders. This one is called Candlewick Rectangles. It can be run through twice to create embossed details. In this card, I did not take that extra step. I just really love the circle/diamond pattern it creates around the edge. It's really different and adds a lot to a card. 

I stamped this onto marker paper and colored it with Copic colors. I used the package illustration to guide my shading and color choices. I think it’s great that you can always use the package illustration for an example. One thing I changed up though was the bed color. I made mine into a brass bed of course!

COPIC COLORS USED:
0, C1, C3
E00, E21, E23, E25, E09
B00, B01, B04, BV02, V17
RV21, R24, YR02

Thanks so much for joining me here today. Don't forget that Ai's current challenge Get in n Shape is running through Thursday this week. Submit your shaped cards (no rectangles or squares) for a chance to wins Ai stamps of your choice. Click on the image below to be taken to the challenge post.

Thanks for stopping by today. Have a great week!

Happy Creating!

Janet YouTube - Blog - Facebook - Instagram - Pinterest

I Love You A Sloth!

I've been working on Valentine's Day cards lately and I couldn't wait to bring out the sloths from the Eyelet Outlet Sloth and Koala brad set for this card. The koalas are perfectly sized for the small branches I have in my stamp and die stash. In this case, I decided to use dies for the branches and leaves. Pastel Leaf brads and pink and red Heart Enamels were also used as embellishments. The sky background was created by using two pieces of Sky Washi tape on a small piece of cardstock. I placed it under the scalloped window so that the seam is mostly behind the lower branch. It disguises it very well. Although not much is seen of the cute pattern, I used a border of Sloth Washi tape on the card edges. It gives a nice black border to the bright green paper and I like that there are little flowers peaking out as well. You can get all of these items and more at the EO store.

This is an A2 sized card with a 4" x 5 1/4" green panel. A scallop die from my stash was used to cut an opening in the front. After attaching the branches and the sky panel behind the window, I used foam tape to secure it to a white card base. The phrase was cut with a design from Cricut Design Space.

Happy Creating Everyone!


                                     Janet YouTube - Blog - Facebook - Instagram - Pinterest  

Shaping Up for the New Year!


Congratulations everyone! We made it to 2022! No matter what else the year will bring, I am determined to make it a year of creative growth. 

After the holidays, a lot of us have had enough of our clothes fitting too tightly. We start to eat better and add a little more exercise back in. At least that's me anyway. After gaining a few holiday pounds, it's time to get back at it. It's kind of a grind to get started but with a little humor it's a lot easier. What better way to get some humor into your life than with a great stamp set from Art Impression? 

My card today is made from the Pamper Yourself stamp set. The funny sentiments paired with two hilarious mature ladies makes this one of my favorite sets. I am inspired by our current Get In Shape Challenge which is going on at the Art Impressions blog through next Thursday. I hope you'll join in with us. It's easy and you could win Ai stamp sets of your choice. Click on the challenge image to participate!


It was fun to make a card base that wasn't the typical rectangle or square. The towels were perfect for the sentiment I chose to use. The shape came from Cricut Design Space. I sized up the towel image for a card base and cut all the pieces for the front and a blank solid piece for the back. I attached the two pieces with a fold at the very top of the blank card base. When the front is glued on to the area above the fold, it allows the card to open from the bottom and stand. This method works like a charm to make a card base out of nearly any shape.

Copic Markers Used:
C00, C0, C3, C5
BV00, BV02, BV04
E000, E00, E04, E11, E21, R20

Happy Creating!
Janet YouTube - Blog - Facebook - Instagram - Pinterest

Retro Valentines For Your Vintage Valentine

I bet most of us remember typewriters and rotary phones. It’s hard to believe but those things are now considered vintage. Does that mean I’m vintage too? Never mind. Don’t answer that!

Today I have a pair of valentines featuring old fashioned machinery a lot of us used to know and love.

I love the vivid cardstock colors in the Astrobright line of cardstocks. They are especially great for children’s cards and for lighthearted special occasions like Valentines Day. For these valentines, I used Re-Entry Red for the card bases. The die cuts are cut from Lift Off LemonPulsar PinkLunar Blue and a little more Re-Entry Red. You can purchase the cardstocks used for this card from CutCardStock's webstore.