Happy Saturday everyone! Like a lot of crafters, I've been working on Valentine cards and today I'm bringing you some cute children's valentines made with the 6 freebie stamps that were released with the second 2021 new releases from Art Impressions.
I stamped these cuties and colored them with Copic markers. Then they were fussy cut and arranged on hearts that form an off the edge valentine. The white cards and the patterned card base were cut with the Rectangle A2 Double Stitched Dies. These fit into A2 envelopes and have blank white cardstock on the back where any message can be written.
I think grade school kids would love these for their friends. I get a chuckle out of the punny sentiments that go with each animal. I made the sentiment cards using Microsoft Word.
I know a lot of you have some or all of the freebies. I have made a video that shows how I made these. If you are curious what colors I used and see how I colored each of them, click the thumbnail.
Thanks for stopping by today. Ai has many adorable stamps to use and I hope you are having fun making your valentines!
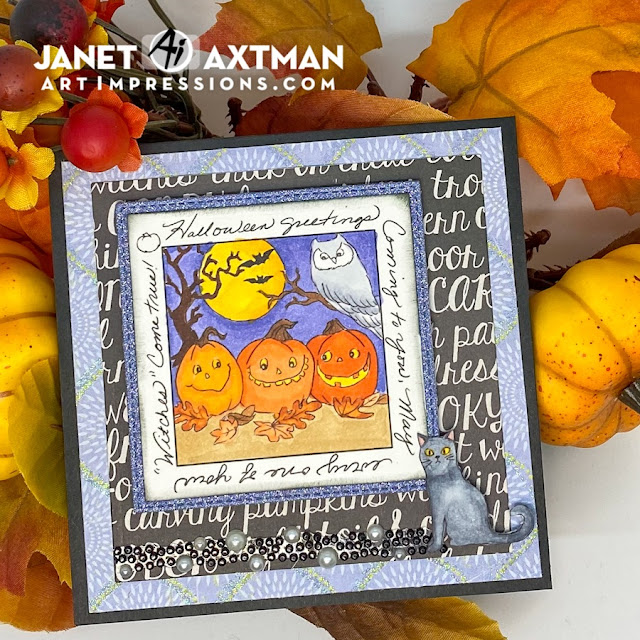
New releases are starting to come out at Art Impressions. Woohoo! There's so many amazing sets coming out for everyday, fall and winter/holidays. Today I'm showing the first of several new Window to the World sets that will get announced over the next few weeks. This one is sure to become a fan fall favorite. It's called Spooky Window Set and it's available NOW at the store. This set also is sized to coordinate perfectly with the Shadow Box Window Die which allows a 3D look.
The sentiment surrounding this image was too good to hide so I cut the window and created a stitched frame in purple glitter paper with the Square Double Stitched Rectangle Set to make it visible. The card opens and the image shows through from the inside. I colored the images with various orange, purple, yellow and brown Copic colors. The cat is its own image and the set includes the die for it. I had to make this one black using cool gray Copic Colors. To add some magical sparkle to the card, I used a strip of pearl and black gem bling and purple cardstock with a hint of glitter in the pattern.
One of my favorite things about the Windows to the World series is that the images are small and it doesn't take long to color them up in your favorite medium of choice. From pencils, to markers, to watercolor, it all works wonderfully and quickly!
Today I have a card using a variety of techniques and Art Impressions and Eyelet Outlet products to create this fun Windows to the World Scene. I am playing along with the current AI challenge on the blog. The challenge is to make anything with clouds on it.
It's time for a new Ai release! Today I'm going to share two cards created with the fun new Laughlines Sets! These sets include either a lady or gentleman enjoying their favorite chairs. These come with a lady or gentleman and loads of punny sentiments to go with them.
The first set is called Rock On. I chose to use the sentiment, "Happy Birthday Rock On!" There are so many to choose from, it's almost hard to pick one. I made this card interactive. When the tab is pulled, the rocker actually rocks! It's a cool way to use this set.
As usual, I've made a video showing how this card is made. Check it out below.
I made another card with the new Laughlines set called, "Sit Back." This one features a gentleman enjoying his favorite recliner. I colored the recliner to resemble my Grandfather's brown and gold plaid one that my Grandfather loved. It was really fun to travel down memory lane when I made this one.
After coloring and fussy cutting the image, I cut the card pieces out of the same stamp pad. I love combining patterns and colors and using papers from one pad assures that the colors and tones work well together. I used the Ai Circle Double Stitched for the circles that provide a landing place for the man in his recliner. I also stamped the Recliner King sentiment from the Sit Back set.
After placing the background paper and circle mats on the card, I cut out the sentiment and a scalloped mat for it.
I wrapped strands of gray floss at the top of the card panel and attached the sentiment in the middle. Then I glued this panel on to a gray A2 card base.
If these two new releases were not enough, there is a new Gift Card Holder set celebrating birthdays this week. Here are two examples of what I made with this fun new Birthday Cake Gift Card Holder! The center gift card uses all the dies. You can see all the options available to decorate the cake. The other two were made by manipulating the dies to create shaker versions of the cake. I love how dimensional and colorful these turned out. Check back on Saturday when I'll show you how I made the shaker cakes for even more ways to use this set. Just remember that this set is designed to be used with the Envelope Gift Card Holder Die Set, sold separately.
Thanks for stopping by today and taking a look at the new Laughline Sets and Birthday Cake Gift Card die set.
Hi everyone! I made this card today as a special request for a friend of mine who loves Doxie's. After I told her I had joined the Ai Design Team, she sent back a photo of the Dog Twist Tie set from the store and asked me to make her that. I was not going to disappoint her so here it is!
The truth is she really didn't need to "twist" my arm to make this card. The Twist Tie line is so much fun. Before I made the card, I did a little research on YouTube looking for any tips I could find. I did pick up a few but I wanted to line the inside flaps with patterned paper to cover up the Copic ink that would seep through. I couldn't find instructions on that so I decided to make a video with the method I used and also how to line up the stamps and dies for the best results. You can click on the video below.
I colored the dogs and the scene with Copic colors:
E39, E37, E35, E33, E31
C9, C7, C5, C3, C1
G28, G20, YG63, YG25
R37, RV32
If you have a Twist-Tie stamp set, take it out and give it a try again. If you were always intrigued but didn't give it a try, visit the store and the many different Twist-Tie themes available.