Hello! It's Janet wishing you a crafty and fun day! We've moved into December so you know what that means - Christmas is almost here! Yay! I like Christmas traditions and I always have a red and green tree at our house but I also have what I call, "my artsy-fartsy" tree. This is the tree where I get to try out new colors, trends and anything that tickles my fancy. This year, it's pink and gold. Now, I'm not a pink girl usually but something about pink and gold with winter snow, lace, feathers and so forth just makes me feel all warm and fuzzy inside. As it happens, it's my turn to host the Bitten By The Bug 2 blog. My two week challenge to you is to make anything holiday featuring pink and gold. Christmas, New Year, Hanukkah - you name the holiday, pink and gold will work. Get your project in by 7 am EST on December 23rd.
Hello and happy Monday! It's that time of year again. Only two days to go before it's time for the annual feast day throughout homes all across the United States for Thanksgiving. This is my absolute favorite work holiday because we get Thursday and Friday off, making this the only guaranteed 4 day holiday of the year.
Today I'm celebrating food through the Celebrate with Food challenge going on now at Bitten By The Bug 2 challenge blog.
Hello my clever crafty friends! I am super excited because today I am sharing projects I made as a Guest Designer for Alpha Stamps. They sent me a whole bunch of awesome things and I'm here today to show you the items I made.
Alpha Stamps has a monthly kit option so since I love kits, I chose to concentrate on making my items with it along with a few extra goodies they sent me and some things from my personal collection, which my husband has named the JCS - Janet's Craft Store. LOL!
The kit this month is called the Christmas Baking Treat Box Kit. It has a baking theme and includes some great products. Click on THIS LINK if you'd like to see everything that's included.
Hello everyone! Today I'm here again for the Bitten By the Bug 2 Blog. Our challenge for the next two weeks is Anniversary. It can be for any time of the year and any kind of anniversary but it must be made at least partially with a Cricut Machine.
I decided to make a 50th Wedding Anniversary card and I used a file from Dreaming Tree called, Dove Cascade Card. It is a simple one to make but has a real impact.
Happy Monday everyone! Today I'm posting a fun little treat box you can use so play the, "You've Been Boo'd" game with your neighbors and friends. If you don't know what it is, you simply leave a box or bag of goodies with something saying they've been boo'd on their doorstep. You ring the bell and run away. The idea is that they will join in and leave a similar box on someone else's door so that pretty soon the whole street has joined the game.
This treat box will hang on someone's door for an extra fun touch. The box is my project for the Bitten By The Bug 2 challenge blog. The challenge for the next two weeks is Fall Holiday - Anything Goes. I hope you'll stop by and enter one of your projects. All that's required is that it meets the theme and at least some of the project was cut with your Cricut machine.
Today's project comes from the online store called Jamie and Jenn. If you haven't been there before, you can find all kinds of cute .svg files there.
I don't know about you, but I'd love to get a box like this left at my door! I'm going to cross my fingers. :) In the meantime, I think I'm going to sneak next door and leave this guy to get the party started!
Hello Clever Crafty Friends! Today I'm posting for the Bitten By The Bug 2 challenge blog. The challenge for the next two weeks is to make something with a pumpkin theme using your Cricut machine. I chose to do a trio of pumpkin Halloween cards. I needed these to send out so it was perfect timing. You can choose to make something fall or Thanksgiving themed. It just needs to have pumpkins involved.
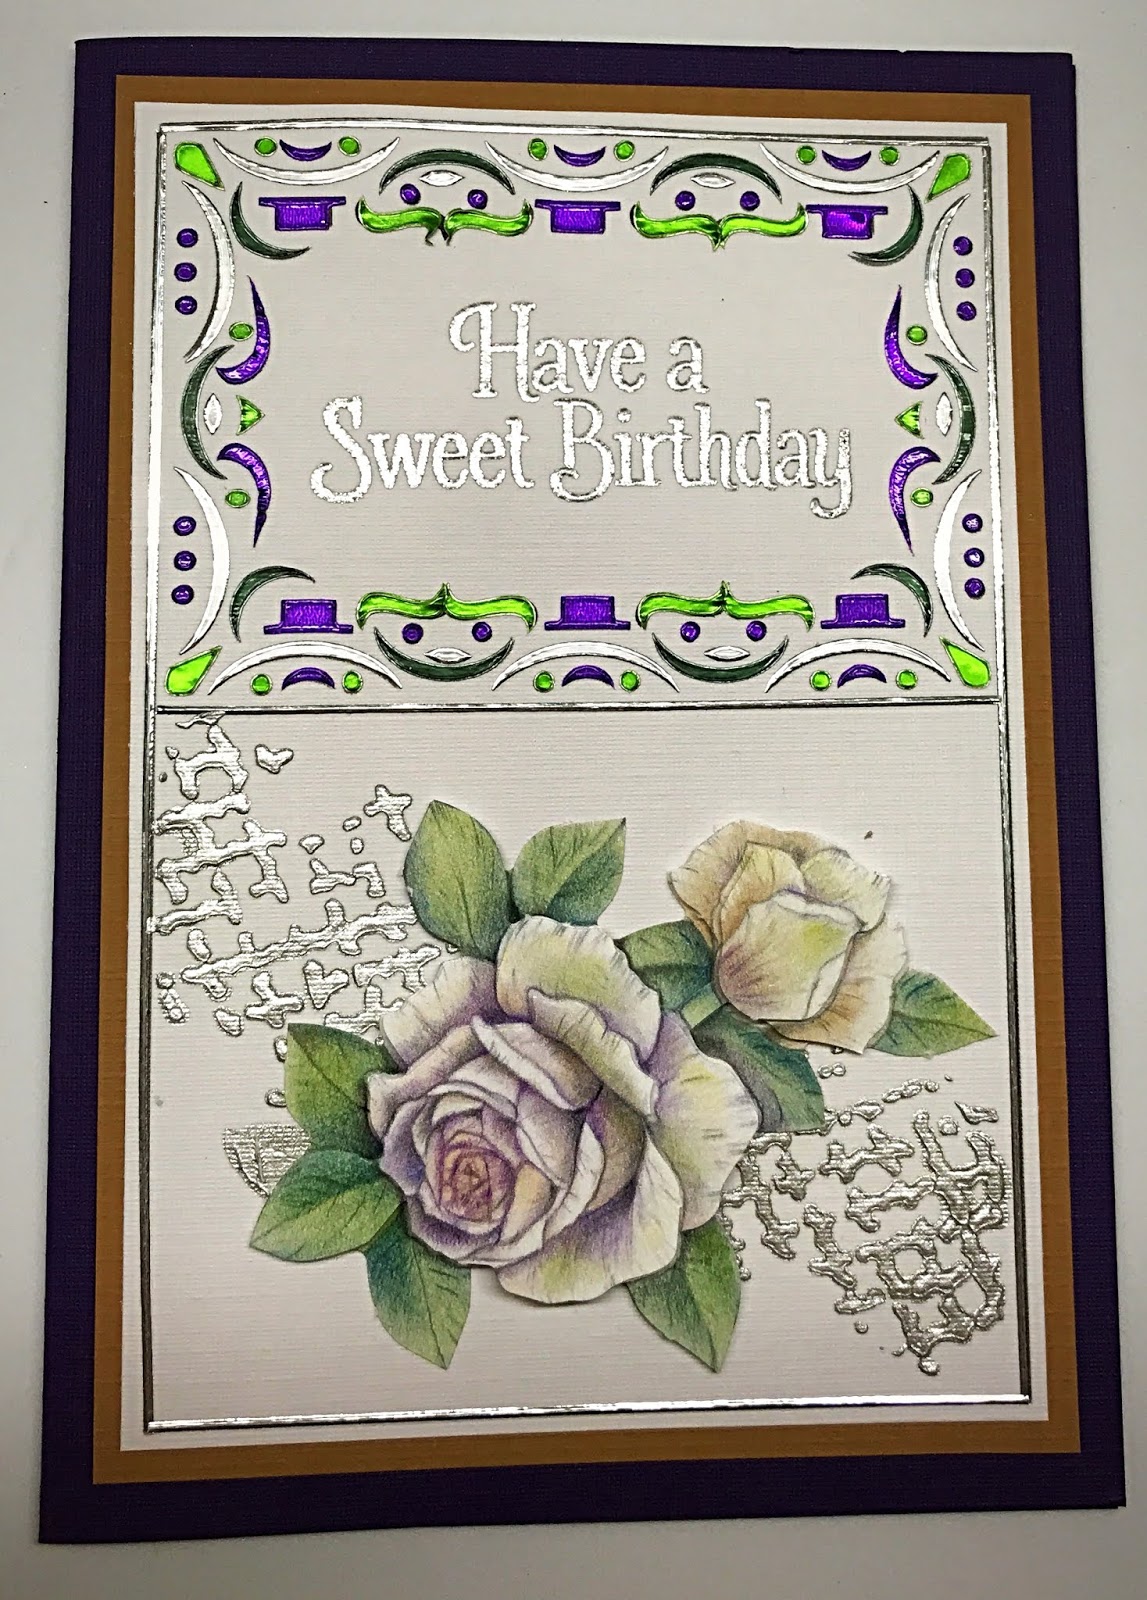
Hello clever crafty friends! Today I'm throwing my hat into the ring by auditioning for the Couture Creations Design Team. If you're not that familiar with this brand, they are an Australian company that offers a wide range of products to the crafting community. If you are familiar with them it probably is because of their outstanding hot foils, dies and other foiling products. Their hot foil happens to be my favorite of the many brands I've tried. However, they carry a huge line of crafting supplies and tools. Foils are just one of Couture Creation's many products.
I decided to give one of their product lines, Dot and Do a try. This system reminds me a little bit of the sticker books I used to get when I was a kid. The premise is simple. Find a sticker that matches a shape on a template and apply it over the top. As you add more stickers, a beautiful pattern of shiny colors takes shape until you have a completed card panel. But that's not all! (LOL! I love saying that!). Also included are decopage images in 4-6 pieces that you layer up using foam tape to create a lovely 3D focal point on the foiled card panel. The results are quite amazing.
Cupcake Card - Purple Cake Kit
Rose Panels - Purple Flowers Kit
I found the process really relaxing. It's similar to working on a jigsaw puzzle only a lot faster and very satisfying in a short amount of time. As you work, you discover what colors your design will be since each shape comes from one of the 4 colored foils. The exception to that are strips and small dots. Every sticker sheet has those options so it allows you to pick the colors you desired for those shapes, thus giving you flexibility to make it your own.
Iris Card - Purple Cake Kit
You can get many different Dot and Do kits on Amazon and other places but the one I purchased came from HSN. In this kit, I received two Dot and Do kits, each making at least 3 cards. The set names are Purple Cake and Purple Flowers. Included in this kit is their picking tool which looks like a pen but has a sharp pick instead of an ink refill. This is a perfect tool for picking up and moving the stickers to your template.
Flower Heart - Purple Flowers Kit
As you can see from the photos, the cards made from the Dot and Do kit are gorgeous. I enhanced them with some softly applied Oxide ink and gems. I used stamps also to create several sentiments although I left many without sentiments because I didn't feel they were needed and would take away from the cards themselves. I used stencils and ink or silver glaze as well. The designs really don't require enhancements but I had fun seeing what ideas I could come up for backgrounds and accents.
Wreath - Purple Flowers Kit
I hope I've successfully piqued your curiosity to check the Dot and Do line out a little further. I've got a video showing all the parts and pieces of the kits I used, close-ups of the finished cards and a tutorial showing you how to make the card pictured below.
Thanks so much for stopping by today. I hope you enjoyed learning a little about Couture Creations and their Dot and Do card line. Let me know what card you like best!
Janet
Link to the HSN Dot and Do Kit featured in this post: CLICK HERE
Link to Couture Creations Collections on Amazon: CLICK HERE
Link to US Facebook Page: CLICK HERE
Hello everyone! I am excited to celebrate reaching 10,000 subscribers on my YouTube channel. It has been an amazing experience getting to know so many viewers and sharing projects, tutorials and product reviews. I have grown so much professionally through my YouTube experience and feel so very fortunate to have such a loyal following.
To celebrate, I doing a giveaway! A lucky subscriber will receive a $100 Amazon e-gift card. Click on this link or on the thumbnail below to go to my video where all the rules are posted. Hurry! The deadline to register is midnight this Friday, October 11th.
Hi Everyone! I guess it's October but you sure wouldn't know it by the weather here in the Charlotte area. We had yet another 90+ degree day here. It's something like the 9th day in a row! Ugh!
Today I'm posting a treat box for the Bitten By The Bug 2 Challenge Blog. The two week challenge is to make something that includes crows, scarecrows or sunflowers and is made at least in part with your Cricut machine.
Since Halloween is fast approaching, I've been making some treat boxes and this one is a lot of fun and really fast to make. The box is cut from one 12 x 12 sheet and requires just a tiny bit of gluing on the side to hold it together. My kind of box! It stands 4 3/4" tall and is 3 3/4" wide. The Happy Halloween label is just 2" x 2 1/2" and can be cut from scraps. The orange glitter cardstock includes 4 pieces that are glued in place to make the sign. These are matted on a piece of black cardstock. Putting it together really takes no time at all, start to finish.
The cuts are all part of the Cricut Access Subscription. These are the designs:
Tags, Bags, Boxes and More 2: Gable Box Square, #M4718E
Elegant Edges: Square Bird Frame, #M41DEC
Creepy Critters: Happy Halloween Wall Art, #M79E90A1
Here's a video showing how to design the box all the way through putting it together. If the video thumbnail doesn't work, use this link: Treat Box Tutorial
I cut the box from a 12 x 12 pad I got at Tuesday Morning recently. It's DCWV and called Dark Fairytale. I love the dark and bare tree pattern in the page I chose to use. Perfect for a crow to hang out in! The orange glitter card stock is cut from a 4 1/2" x 6 1/2" pad of DCWV cardstock called The Glitter Cardstock Matstack. To finish the box off, I tied a neon green grossgrain ribbon at the top from the Dollar Tree. It adds just enough of something extra to the box. If you make this one up, I know the compliments will be coming your way!
I hope you like my project today. Head over to the BBTB2 blog to enter your own project featuring crows, scarecrows or sunflowers.
Hello everyone! I have a tiny craft space so when I heard about the new We R Memory Keepers The Works-All In One tool, I was intrigued. This new tool incorporates 10 tools into one unit. Yes! 10! It includes a trimmer, score board, precision stamp press, punches and guides to make tabs, tags, banners and envelopes! Wait! There's more! It also can help you make bows, pom poms and tassels. Whew! That's a lot. Check out my unboxing of this tool. I know you have to be a little curious!
Head on over to the video and see how all these amazing tools are incorporated into something that's about the same size of a normal score board or trimmer. If you have any trouble with the video thumbnail, click on this link instead The Works - All In One Review
Thanks for stopping by today. I'll see you again soon with more on this very compact and interesting tool.
Hello! I'm posting today for the blog Bitten By the Bug 2. The challenge for the next two weeks is to make a project honoring grandparents or grandchildren.
I chose to make this layered 5 x 7 flowered card using the Anna's Lovely Layer's 2 cartridge I picked up a long time ago at Tuesday Morning. I think this is the first time I've used this cartridge and I will definitely try it again soon. It's really easy to make very beautiful cards using Anna's designs.
The Sentiment is written with the We R Memory Makers Foil Quill using the wide nib and foil from Couture Creations. The mat was a scalloped tag that I altered into a sentiment mat. I cut off the top of the tag in Design Space copied it, rotated it so the scallop was also at the top and them merged the two pieces together so that both the top and the bottom of the mat was scalloped. I put the sentiment piece on foam tap before putting it on the green patterned background. The bow was gifted to me by a subscriber and looks just fabulous on this card!
I love the envelope file that came with this card as well. The flap is a separate piece from the rest of the envelope so it's really easy to pick a contrasting piece of cardstock. I chose the same green patterned paper I had used on my card to tie it all together. The finished card is soothing and pretty.
Thanks for joining me today! I hope you'll head over to the BBTB2 challenge blog and post a project having to do with grandparents. Just follow the theme and be sure to use your Cricut machine to create at least one element of the project.
Hello everyone! Just dropping in quickly to let you know that I'm participating in a fall YouTub hop that starts this Saturday at 9 am Central. You can learn about the details in the below video. If that doesn't work for you, follow this link. https://youtu.be/JqDzsFFWGZ0
I hope you stop by for some inspiration and great giveaways including a $50 gift certificate from Art Glitter Glue and Renea Bouquets plus every designer will have a channel prize too.
Hello my crafty friends! I am sorry it's been so long since I last posted. August was a busy month! I spent the first half on a wonderful trip with my family. We visited Belgium, Germany, Austria and Slovenia. Once we returned, there was a lot to do to catch up at work, home and with friends. Today I'm posting a card for the Bitten By the Bug 2 challenge blog. The theme is Get Outside! Outdoor events: BBQ, Picnic, Fireworks, Sports, Hiking or Camping. It's so much fun! My card is a fun card to thank someone special in a punny way. Isn't this little penguin just the cutest?! This pattern comes from one of my favorite .svg companies, MyScrapChic. This pattern is appropriately called, Thanks a Melon. This is a simple file to cut and put together. To create some shine, I decided to use Nuovo Crystal Drops in Ebony Black to create the melon seeds. I also cut the melon word in red cardstock, applied glitter to it and covered it with Glossy Accents. After using white gel pen on the sun glasses lenses, I applied Glossy Accents to it as well. White gel pen was also used to accent the watermelon, the penguin's feet and hat. Dry embossing the grass to add some texture finished this cutie up.
Thanks for visiting today. I encourage you to visit the BBTB2 challenge blog and post your own card. The only requirement is that you follow the theme and use your Cricut for some part of the project. Have a great Labor Day and I'll see you soon!
Hello! Today I'm here for the Bitten By the Bug 2 challenge group with a just "beachy" card. I found this file in the community section of Design Space. Search for Under The Sea Card Workshop - 1. There are actually 4 cards that have been designed and shared by a fellow crafter, Laura Beacham.
She did a fabulous pulling together designs from many different cartridges and image sets to make these cards. This is the link in Design Space so you don't have to go searching: Design Space File
This was one of my favorites from the set she created. I used a couple embossing folders to add texture to the water and the sand. The sentiment is written using the Cricut which is always nice to be able to do. It's a perfect card for a kid or a kid at heart. In this case, it's going to a co-worker.
Please share your beachy summer cards with us over at BTB2. The only rules are to follow the theme and use your Cricut machine to make all or part of your project.
Hello clever crafty friends! I'm back again for the two week Bitten By The Bug 2 challenge blog. This time the theme is anything with a banner. I hope you join us in the next 2 weeks. The only requirement is that you follow the theme of having a banner and that at least some of your design be made with a Cricut machine.
Do I have a cutie for you today my friends! This is the brand new file from svgcuts called Lemonade Stand. It's part of a set called Sun Valley Box Cards. You can buy this entire set or just individual files. The whole set is adorable but I really wanted this card so I just bought this file. I love that you can now buy individual pieces instead of buying an entire set at svgcuts now.
The simple but effective details on this cut file are just awesome. Just look at the pitcher of lemonade, the tub of fresh lemons and all the refreshing glasses of lemonade just waiting to be sold to the first lucky customers! Then there are the cute little details like the flower is actually a lemon slice!
This file comes complete with holes for the flower and leaves. I chose a gem style flower brad in a cheery yellow to hold the two pieces together. There is a hole in the flap so you can get perfect placement. There are also holes in the flap for the cording that you'll use for your banner. The cuteness continues on the side where you can see the side flap and more of the details for the stand itself.
The file comes together very easily and simply and also conveniently includes an envelope pattern for it. This is a huge winner in my book. I love the fresh and happy look of this card!
This design could be used for many occasions but it happens that I need a cheery get well card for a friend. On the back, there is a place to stamp a sentiment. I stamped it with Get Well Soon and added some pretty matching sequins with glue dots. I would recommend using something strong like glue dots in this situation as it may go through lots of heat in the mail this time of year and I'm afraid liquid glue may get brittle and allow the sequins to pop off in transit.
That's all for me today. I hope to see your creations featuring a banner over at Bitten By The Bug 2!
Hello my clever crafty friends! Today I'm here again for the Bitten By The Bug 2 challenge blog. This time the two week challenge is to do anything but a card. The only requirement is that you make some or all of your project with a Cricut machine. The blog can be found here: BBTB2 Anything But A Card Challenge. Please go there to play along.
The cut design for this project is from Tina Fitch at Forever Memories for you. At the time of publication, the site was having a sale on most designs. This is a British site so prices are in Euro. PayPal will convert your purchases to dollars. The pattern will be delivered as a download so there are no shipping costs. The link to this pattern: ANGEL TEALIGHT TABLETOP DECORATION
This is also Part 2 of my Foamiran rose experiment. In Part 1, I showed how to make these roses. In this video, I show how I used my roses to decorate this project. You can find Part 1 with the rose construction HERE
I found my Foamiran at Whimsy Stamps. If you order from them, I’d greatly appreciate it if you’d tell them in the special instructions field that SugarShine Designs sent you! WHIMSY STAMPS - FOAMIRAN
If you'd like to learn how to make this, I've done a video tutorial for you. You can click on the thumbnail below or directly on THIS LINK.
Thanks for joining me today. I do hope you'll check out the tutorial and make something for the Bitten By The Bug 2 (BBTB2) challenge. I look forward to seeing some of your creations!
Before you go, please check out the following links to supplies used in this project.
SHOP for all my favorite supplies and tools including some of the supplies used in this video. Your purchases earn a small commission to me at no cost to you. Thank you for your support!
Hey clever crafty friends! It's summer and the living is easy. In celebration of the Summer theme at the BittenByTheBug2 challenge blog, I've chosen to use the Foil Quill tool with my Cricut Air to put a lovely golden ice cream cone on water color paper. Then I pulled out my Zig Clean Color Markers and water colored my favorite flavors - strawberry and chocolate chip mint. Ok, so usually it's green ice cream with chocolate bits. For some reason, I did it the opposite way on this card. I've invented a new combo. Ha, ha!
It's hard to get the pretty foiling but here's a close up and you can make it out a bit better. This design is from the Foil Quill Amy Tan Design Drive.
I have a few videos reviewing the Foil Quill System, what types of materials will foil and what foils work with it. You can find the YouTube Playlist on my channel here: Foil Quill Reviews & Tutorials
I added some texture to my red and white zig zag A2 card base by embossing polka dots to the front. I tied a bow around the panel with some red and white baker's twine. Then I put my finished water color panel on foam tape and applied it at an angle. On top of that I placed a label from the Cricut Close To My Heart Cartridge called Art Philosophy. The shape has a matching design that I thought was cute with this super casual birthday card.
This card went together super fast! I love a quick birthday card don't you?
That about does it for me but keep an eye out for a video I'm working on that shows how I made the card using the newest Foil Quill accessory, the Magnetic Mat. It works great to hold the foil in place without Washi tape.
So what summer themed card or scrapbook project have you been working on? Show it off at the BittenByTheBug2 challenge blog. The two rules are to follow the theme and use your Cricut machine in at least one element.
Hello! Today I have another Father's Day card to share with you. I think this one is so much fun! It's an easel card made to look like a grilling apron. It has a pocket to hold a spatula, fork, a hot mitt and a barbecue sauce bottle. I think it is so cool! This would make a great card for any BBQ Master in your life for any occasion. I stamped this with a Father's Day message but it could be perfect for a birthday, thinking of you card, a thank you, or even as a barbecue party invitation!
My family likes to camp and my husband loves to grill when we're camping. I had this great camper card stock in my stash and I'm happy that I could combine his love of camping and grilling in this card. It makes it very personal. If your guy likes to fish, golf or enjoys a certain sport or team, you can really make this card to fit a theme. This is why I love making cards. You will never find it in any store. It's made just for the person you have created it for. Awesome!
Each piece in the pocket is removable. The white apron insert can be taken out so you can write your father's day messages there. If you have several children or if this is from you and your siblings for your father, this card has lots of room for your personal messages. The back of the bottle is lined in white also for this purpose. The pocket is also handy for a gift card. Just sayin!
I cut the pieces for this card with my Cricut. The file is from My Scrap Chick. They are one of my favorite companies because they have a large variety of files and they are always well done. This one is called the BBQ Pocket Easel Card
I've posted this card in the Bitten by the Bug 2 challenge blog. You can enter your Cricut cut Father's Day cards there through next week.
Thanks for stopping in to take a look at my card. I hope I've given you some inspiration. Happy Father's Day!
Hello and happy Monday clever crafters! Today I'm posting a project for the Bitten By The Bug 2 Challenge Blog. The theme for the next two weeks is Father's Day. I need to make a couple cards this year and I was excited to find this design in the Cricut project section. I love retro themes so this project was the bee's knees!
This is a design provided by Cricut in Design space. It's called Daddy-O Father's Day card. You can find it by going into the Projects section and filtering for cards and then Father's Day. I thought it was a perfect card for my Father-In-Law. This fella's red tie and hairstyle is so much like him in his younger days. He was a dapper dude, yes indeed!
I manipulated the file a little bit. First I didn't cut the white pieces to go on the banners as the file suggested. Since I opted to use silver vinyl for the lettering, it wouldn't show up very well. So I applied the lettering directly to the light brown part of the banners. Also for the banner middle sections, I used the contouring feature to shut off the lettering because the file had the lettering on them. That was a little strange since it also had the lettering as a stand-alone file. Maybe they were just trying to provide options. Either way, that didn't work for me so I got rid of it. Now I have to tell you that I discovered that I loved these banner patterns. When you put the middle section up on foam, you get a really nice 3D banner appearance. I will be using these again for other project for sure! Finally, I didn't make the included envelope that comes with the design and opted to pull one from purchased A2 envelopes that I keep stocked at all times. It looked like a great envelope file though if you are in need of it.
So I have a confession. I've never used vinyl on a card until this project. I've been missing out! My Cricut Air cut the vinyl like butta! I first tried unsuccessfully to cut the lettering from paper. The cardstock I used was not going to have it! The results were poor and it wasn't my blade because it was brand new. So I decided that I was not going to give up and pulled out my vinyl. I'm glad I did because it worked awesome. This might be my new go-to for card lettering, especially if it's small.
Here's the inside of the card. In addition to stamping it, I used some of the main cardstock as a liner for my envelope. I tend to line the envelopes a lot more often than I used it. It just makes such a nice presentation doesn't it?
The gold top hat was an ancient embossed cardstock piece I had which had to be fussy cut. I bet it's nearly 20 years old now. I think it was was a group on a cardstock that I purchased when I first started scrapbooking years and years ago. Nothing goes to waste though. No siree! And look how great it is used here!
Well that'll do it for me today. Please go check out the BBTB2 Challenge Blog and upload your father's day card. Come on! I know you've made one! The only rule is that is has to be cut with a Cricut machine but you can use any pattern from any store. Hope to see you there!
Hello! Well it's been a long time since I've posted. I'm sorry for that. I've had quite a time being sick from allergies the past month. I fought with it for over two months and had to go through two rounds of antibiotics to reverse sinus and ear infections. To make it worse, I had to fly during this time. But it's all much better finally and I'm getting back into the groove.
Today I'm posting for the Bitten By the Bug 2 Challenge Blog. Like so many people this time of year, I needed a quick graduation card and that fit nicely with the challenge theme since it's graduation! I encourage you to make your own Graduation themed project and enter it into the challenge. The Design Team really outdid themselves. You're going to love seeing what they made. You can go to the challenge here: BBTB2 Granduation Challenge. The only requirement is that it is graduation themed and made using your favorite Cricut machine. Go for it!
This card couldn't be easier. The A2 card base is a simple cut in Design Space called Congrats Card - #M97B1F. I cut it out on a black multi-colored glitter cardstock. I love the formal but still festive feel of this cardstock. It's by Core'dinations and is called Black Tie.
After cutting the base, I cut a white cardstock rectangle slightly larger than needed and blended four colors of Distress Oxide ink on it. I used Salty Ocean, Worn Lipstick, Squeezed Lemonade and Cracked Pistachio. You can see below that I blended the colors well but not really well. The cutout in the black cardstock will distract the eye from any blending that's not perfect. Did I mention this was a quick and easy card?! I also find that the finished blending always looks better after it dries. It seems to soak into the paper better and blend even more during the drying process. Once it dried, I trimmed it down to an A2 size. Trimming takes the harsh inked edges off for an overall better look.
Next, I applied Art Glitter Glue on the back side of the card front and applied the Oxide panel underneath being careful to wipe away any excess glue that seeped out. Wow, was the result fantastic! If you don't have distress inks, you can use any pretty paper underneath this cut for a similar look.
To finish the inside of this card, I cut another pattern from Design Space called Graduation Cap, #MC252B73. I had a stamp in mind and made sure that the cap would be large enough for it. Sorry for my well used and loved mat. It's a little dirty!
I put the cap inside the card for a truly stunning result without a lot of time and work. Don't you love it when you find something so easy but so beautiful! I know I do! The stamp I used is an older one from a Close To My Heart set called Kudos.
So what do you think? I hope you like it and will try this card yourself. It was fun and I loved the results.
Hello my friends! Mother's Day is around the corner and if you're like me, you're always running behind. I thought it would be good to get my Mother's Day cards done early so I can put it in an envelope and have it all ready to mail. So let's get those cards and gifts made and ready to go! It's my turn to host the challenge at the Bitten By the Bug 2 Challenge blog. Your project can be anything for Mother's Day. It can be a card, box or other gift you have made to give to your Mother or Mother-In-Law. It just has to be made using your Cricut machine. The project I made for this challenge is a Mother's Day card that is made of several different shapes from Cricut Design Space. I started by making a white A2 sized rectangle which represents the card base when folded. Then I inserted the design pieces and arranged them to fit in pleasing way. This includes: 1) Fleur de lis Pattern Overlay - Edge to Edge; 2) Mother - Mother's Day Phrases and 3) Tag - Garden Soup. After completing the paper piecing, I inked the Card base and added three sequins.
I hope you'll join me over at the blog. The challenge runs for the next two weeks. I hope you'll submit some of your wonderful Mother's Day creations! Janet
Hello and happy Monday! We are just about at the end of March and Lent is in well under way. It's definitely time to think about Easter crafts. This cute egg shaped card is a great start to my Easter card stash for families and friends. It also happens to be an Easter challenge for the BittenByTheBug2 challenge blog and this is my creation for it.
This egg is made from a Miss Kate Cuttables file called Easter Eggs. It's available free with Access subscription. There are many cute files in the cartridge and this is just one of the four eggs in the file called Layered Easter Eggs.
Below are all the pieces of the card before I put it together. The measurement is 5" x 6 1/4." The foiled sentiment was made using the new Foil Quill from WeRMemory Keepers. The image is called Happy Easter Draw and it's from the Greeting Card Sentiments cartridge. I created a circle shape around the sentiment and foiled the words and the circle before cutting it out as a 2" circle. If you're interested in learning about this new product and an honest review and demo, please visit the video found at the end of this post.
This is not a card file but I converted it into a card by cutting one extra cut of the large scallop piece in cream. I scored this at the top about 1/2" to create the hinge that makes this card base.
Here is the video showing the Foil Quill. If the thumbnail gives you trouble, you can use this link instead: https://youtu.be/-bge6fGxyfw
Hope you're having a great start to your weekend. I have started a Fast Friday series over on my YouTube channel. It is a quick 3 minute tutorial and is meant to give you some inspiration without spending a lot of time. We're all short of time so I hope you enjoy it. This card went together so quickly thanks to the beautiful ribbon and butterfly rhinestone charm from Beebeecraft and the cute owl stickers from the Dollar Tree. Happy weekend everyone! Janet If you have any trouble with getting to my channel from the thumbnail, you can click here: Owl Card Video
Hello everyone! Well St. Patty's Day is this coming Sunday and I've got a cute card to give to your sweetie to remind them how lucky you are to have them in your life- (or maybe he/she is the lucky one! ;) This is a fun card pattern from MyScrapChick. It's called a Gold Coin card (click here for link). I altered it a bit by making it larger - a full 5 inches square. The pattern includes the print and cut shamrock wreath and a printed sentiment that says Lucky. I decided to use the blank sentiment included and used a different font for the Lucky Phrase. I also decided to use a St. Patrick's Day embellishment sticker set by K&Company. The hat, pot of gold and the gems on the card are from this pack. I used the included shamrock from the pattern on the envelope and put the horseshoe from the sticker pack on top of it. This made a super cute card! Here's the card and the chunky envelope I made for it showing the liner.
I cut the envelope from a MyScrapChick pattern as well. It's called Chunky Square Envie (click here for link) and it includes a liner pattern as well. I sized this to fit my 5" card too. I'll show you how I sized and cut all the pieces for this card and envelope on my video tutorial. You can find it by clicking on the thumbnail below. If it gives you any trouble, you can use this direct link instead (click here for video).
Thanks for stopping by today. See you soon and keep crafting! Hugs, Janet
Here's my first of 10 Cards using the February Hero Arts My Monthly Hero Kit over at my channel. This is a great kit full of glamorous roaring 20's art deco images. It's the cat's meow! I've got close ups of each card below and the video link is at the bottom. I hope you enjoy these and be sure to get all the detailed tutorials for each card on my YouTube channel. See you there!
Here's the video link. If you have any trouble with it you can use this direct link: https://youtu.be/lVDMKE3lIao