Hello crafty frieds! I hope you had a wonderful Christmas and got to spend some time with at least some of the people that you care the most about.
We're experiencing some cold weather in the Charlotte area and it got me to thinking of warmer days and trips to tropical places we've visited in our past. I love that no matter the theme, Eyelet Outlet has the topic covered. Today is a perfect example. I decuded to do a jungle themed card because I have a great stamp set from Hero Arts in that theme that I could leverage. And of course Eyelet Outlet had the perfect brads and washi tape for what I had in mind.
I started by applying Giraffe Washi Tape on a kraft 4" x 5 1/4" panel in strips until it was covered. To get smooth edges, I folded over the raw tape edges to the back of the panel. Then I wanted to create circles to hold the elephant, giraffe and ape brads from the Jungle Mix Brad Set. I covered a small piece of white cardstock with Safari Foil Washi tape and cut 3/4" circles out of it. Then I set one of the animal brads in each circle.
The next steps were to cut the sentiment pieces out of green cardstock and vellum and heat emboss them with Hero Arts detail black and white embossing powders. I cut a long rectangle out of a piece of jungle leaf cardstock I had on hand and a 1" strip out of green metallic papers using my deckle edge cutting blade. I stacked these together on the right side of the card. On top of that, I attached the rest of the pieces. I thought the lower left corner looked a little bare so I stamped and cut out a couple tropical plants from the same jungle stamp set that I got the sentiments from. Any jungle-looking die cut or stamp would work for this.
I hope you enjoyed a tropical themed card after all the Christmas projects. I know it felt pretty good to do something a little different for a change.
Hello craft friends. I'm sure you'll agree that we are all thankful that 2020 is soon on the way out. As a wise person said, 2020 stinks, stank, stunk! Time to move on to what is sure to be a much better year.
To make this card, I started by covering a panel with the very pretty Glitter Star Tape and then I cut out the ray pattern using a die from Hero Arts. I also cut out a branch from a die in my collection and a red sentiment label from cardstock. Assembly was really easy. I glued the glittered piece on to a silver foil card base. The center oval piece cuts out with the die so I was able to separately work with the center. I glued the branch down on the oval and placed the Cardinal Profile Brad on the branch and then glued the finished oval to the center of the card. I stamped and heat embossed a white new year greeting on the red label and put Red Mini Round Brads on each side before mounting it on the card with foam tape. The last touches were two white and one red sequin. There are so many things you can do with this basic ray pattern.
Check out the Eyelet Outlet Store for all your brad, washi tape and bling supplies! Have a wonderful week!
Janet
Friday, December 18, 2020
Hello CutCardStock fans! Do you dream of a white Christmas? I live in the Carolinas so snow for Christmas is highly unlikely but I was born and raised in the upper Midwest and know what I'm missing - the good, bad and ugly of snow!
My project today highlights what I envision is the peace and happiness a soft white layer of snow can offer along with a welcoming door where friends, family or others we know and love will greet us. This year, more than ever, being among those we love the most is a real challenge. The door set in a snowy scene is my tribute to all those I love and the fact that I know they are just waiting behind a door that will soon fling wide open and envelope me in love and fellowship. I feel confident that most of us are anxiously waiting for that time to come.
Not all Chistmases have snow. This tropical Christmas card has me thinking of warm breezes and sand between my toes. Sounds heavenly right now.
This A2 sized card was created using cardstock from the Lawn Fawn Really Rainbow Christmas pad. The palm tree was cut on my Cricut with a free file from Printable Cuttable Creatables called Christmas Palm Tree. I cut all the pieces out and put two slits in the sand piece and inserted the bottles from the Beer Brad set. Then I covered the sand piece with embossing ink and heat embossed it with Sand powder from Hero Arts. Then I glued everything down on the back ground and inserted the Holiday Light brads. I also used a Holly brad near the coconuts. I printed the sentiment on photo paper, cut and matted it on matching cardstock.
I was inspired to do this card by the Corona beer commercial where it's a dark night and you hear a guy whistling Oh Christmas Tree. Then suddenly a single lighted palm tree brightens the picture. I love that commercial and the beer isn't too bad either! LOL!
The inside sentiment continues the "warm" vibe. I colored this with Wink of Stella Fine Glitter Pens.
After doing many traditional Christmas cards, this one was a breath of fresh air. I hope it took you on a quick magical trip to the tropics too!
Have a greet week!
Janet
Disclosure: This post includes some affiliate links. Purchases you make through affiliate links will pay a small commission that allows me to continue purchasing new items to inspire you. Thank you for your support!
Have you noticed that striped cardstock backgrounds are popping up everywhere in the card design world? It's such a simple technique and gives a fresh clean architectural look. This 5" x 7" card uses CutCardstock's Stardream Metallic Cardstocks to create a beautiful background and as inlay for chunky outline dies along with CCS Silver Glitter Cardstock and CCS Bright Silver Foil cardstocks.
As I've mentioned in previous posts, my absolute favorite colors for Christmas is traditional red, green and white. Once in while, I have to switch it out and go to pastels for something just a little different and a bit more contemporary. This cardstyle with varying strips of color and chunky outline words & shapes are really well suited to a more modern palette.
Happy Sunday everyone! I hope you've had a great weekend so far. If you're in the US, you probably have given your stomach a good workout over Thanksgiving and then your boday decorating for Christmas and the holiday season. It was nice to take a break during all the hubub yesterday to reflect and make a card to remind me of the Reason For The Season.
The city die cuts and the scroll are from the O Holy Night Collection from Heartfelt Creations. The scroll is cut from their paper pad for the collection so it made it really easy to create this piece of ephemera.
The background of this card was created by placing Silver Glitter Washi Tape on the edges of an A2 card base. Then I placed the corrogated piece on top. Here's a upcycling tip I learned from Carol Duval when I was a wee one (LOL!). Use a liner from a light bulb box! Works perfectly and they tend to be either a nice white or natural color like this one. The city scene is made from two identical Heartfelt Creation die cuts that I cut and stacked to appear as if it were on a hill. I used a few pieces of foam tape for some of the cuts for added dimension as well. I nestled in two Palm Tree Brads and then started decorating the rest of the card.
Around the scroll, I placed the Snowflake Bling-1 1/2" Size and two of the Music Note Brads. To accent the scroll image, I cut single bling apart from Red Strip Jewel Bling. I'm always amazed at how a few Eyelet Outlet Products can take a card from good to great with just a little bit of effort!
Thanks for stopping by today. Enjoy you Sunday and I'll see you again next week!
Are you a traditionalist when it comes to the holiday season or a trail blazer? I am definitely a traditionalist. I LOVE red and green for Christmas and although I admire the pretty pastels that many embrace, it's just not the first color pallette I go for when it comes to Christmas. Today's projects reflect my traditional holiday preference of red and green colors and there are some great options from CutCardStock to choose from.
One image I love for Christmas is fresh florals paired with pine boughs and this is the look that inspired my cards today. The florals on these cards are actually a single very large stamp cut in half and placed on red and green card bases made from CutCardStock's DSC Discount line. This is a high quality 80 lb cardstock with a light canvas finish. In this case, I chose the perfect Christmas Habanero Red and Bonsai Green.
The stamp I used is called Glorious Bouquet, a Tim Holtz and Stamper's Anonymous collaboration. It's not really a Christmas stamp but I love getting lots of use out of my florals and you can make any floral have a holiday look by the colors you choose and adding a little shine. I used Neenah Classic Crest Solar White Smooth. The 110 lb weight is perfect for alchohol ink coloring. After stamping the image with Versamark Onyx Black, I Copic colored the oversized stamp in rustic reds, pinks, oranges and hints of yellow. Then I fussy cut the image out.
I used a Kaptron waterbrush to apply Cosmic Shimmer Green Pearl Opal Polish to the white areas of the cut out image, including the edges. This gave it a bit of a glow and that holiday touch. The cardstock is good quality and it had no problem taking the marker saturation and the watercolor application without puckering or bleeding. It is important to make sure you use a waterproof ink for stamping in this scenario or it will bleed.
After drying, I picked a strategic location to slice this huge stamp in half.
I prepared my 5 x 7 card bases out of CutCardStock Green and Red by cutting each piece 7" x 10" and folding in half. On the red card, I glued a strip of pine tree patterned paper from my scrap stash and then applied Skinny Gold Glitter and Sparkle Copper Foil Tapes from Eyelet Outlet as borders. I trimmed the tapes at the card edges with a scissor. No extra gluing required and the use of glitter tape gives it great sparkle without the mess of working with loose glitter. Extra bonus! The glitter doesn't shed so the recipient doesn't end up with glitter everywhere either.
The next step was to splatter the card with slightly watered down Delta Creamcoat White Acrylic Paint. The white splatter looks so great on the deep red and green cardstock! After that dried, I adhered the stamped image on the edge and added the chipboard word with Joy written in red glitter. I placed a small pointsettia 3D sticker on the O and added a matching star. You can choose to use any large word stamped and/or cut out of cardstock. If you want a chunkier look, you can cut 3 or more layers of the cut word shape and glue them together to get a faux chipboard look.
I proceeded to complete the green card in a very similar way. I chose to use the same pine tree designer paper and the thin gold glitter washi again but this time used Sparkle Glitter Red Washi Tape from Eyelet Outlet in place of the copper foil tape.
I splattered this one with acrylic paint and added the stamped floral image and the chipboard word with Noel written in red glitter. Again, I place a small 3D pointsettia sticker over the O and added a glittered and jeweled holly to the top of the N.
I really enjoyed making these cards. If you a traditionalist like me, you need to check out the beautiful red, green and white discount cardstock at the store. They are the absolutely perfect holiday colors and they are on sale this month. Check them out!
So what are you making for the holidays? Whether it be cards, scrapbook pages or holiday decor items, you will like the weight, color and texture of DCS Discount Cardstock. I should also mention that it cuts very well in both steel dies or in cutting machines. You really can't ask more out of a cardstock. Happy holiday crafting y'all!
Hello crafty friends! Today I'm excited to be part of a great team of fellow CutCardStock teammates who have put together a frightfully good hop of Halloween projects for you. My project is what I call a Spooky Cube! The six sides each feature a letter. Guess what it spells?
Let me give you a hint.
That's right! It spells spooky! I thought this would be a fun home decor item to sit on my entry table along with other Halloween decorations. I love that it is interactive and anyone who notices it will surely be tempted to pick it up to solve for the word.
This cube is 4" square and a decent size. It was simple to construct. I started by cutting the word elements out of a 12 x 12 cardstock from the My Mind's Eye Happy Haunting collection. The word blocks really determined the size of my cube. I chose to cut the squares using Basis Brown cardstock from CutCardStock. I drew in some light tick marks to use as guides for the washi tape placement.
To begin, I attached the squares together on the back side with some wood grain washi tape from Eyelet Outlet to hold it together while I worked on it. I flipped it over and on the right side of the cardstock, I began to lay my strips of washi so that when folded, a cube would form.
As I neared completion I folded the piece into a cube and placed my last washi tape to complete the seams, trimming off any I didn't need.
Then it was time to decorate the cube! I made six squares using a scallop square die cutting from more Basis Brown cardstock. I applied various ephemera and stickers from the Happy Haunting collection. I attached them to the cube with adhesives and brads.
This was a lot of fun to create it's very sturdy. I have no concerns of it coming apart as it is not fragile at all. I know I can use this for a decoration for years to come.
Thanks for joining me today! Hop along with us for a chance to win a $40 gift card from the CutCardStock store! To be eligible for the $40 gift card, readers must comment at each stop along the hop or upload a project that includes product from CutCardStock. The winner will be randomly selected via number generator and announced on Monday, October 19th on the CutCardstock Blog and Facebook page.
The next stop is the CutCardStock blog. Below is a full list of blog hop designers. Be sure to visit each designer and leave a comment.
Here's a delima I faced recently. I promised a set of six handmade thank you cards to every person who ordered above a certain dollar threshold on an online catalog. Sounded good until 14 people followed through! So there I was wondering what I could do that would be special, handmade but not take hundreds of hours and half my paycheck to accomplish. The answer was in front of me the whole time. It was CutCardStock of course!
I've been playing with watercolor lately and it occurred to me I could make small cards ( 3 x 3) with a splash of water color and then stamp an image on the top. It makes them a little out of the ordinary but would be a quicker way to make 84 cards. I remembered I had this cute little pig stamp from an old Stampin' Up set and I thought it would be just the thing for the project.
The next challenge was finding a source for nice quality but still economical cardstock for the project. Time was almost as important as money so I decided it would be best to find ready made card bases with matching envelopes. I found this was not inexpensive however. I checked a few online stores and my local big box stores and found that buying 85 3 x 3 cards with envelopes would have cost as much as $45 dollars and honestly, the quality was questionable. I like my cards to have good weight to them and be similar to cards you can get from a good stationer. The cards I found didn't have the weight on them which is usually a clue that they're light weight. And don't even start about the envelopes! Often they are really lightweight and flimsy.
The answer was of course to purchase everything from CutCardStock. I was able to purchase 100 3 x 3 gray cards with matching envelopes as well as the front panels I would water color for roughly half of what I would have paid for flimsy, plain white cards with no front panels.
Friends, CutCardStock has a large number of options when it comes to mass production of cards. You can customize sizes ready to go or have pieces cut and scored to meet your need using just about all the cardstocks available for sale. In my case, I purchased two packs of 50 ready-made cards and envelopes. I purchased a pack of 25 sheets of Royal Sundance Felt and used their custom cutting services to cut 84 2 3/4" squares to use as my front panel. The best of both worlds!
I recorded a video tutorial on how I mass produced my cards as well as how I made inexpensive but pretty packaging for the 14 sets of cards.
I started by mixing up pink watercolor and painting a quick splash of paint across all 85 white card panels. Once dry, I stamped all of them with my Tickled Pink stamp. I used a small Thank You stamp inside each gray card base and then I folded them all. That was the easiest part since they were already scored! Then I used adhesive to place each panel centered on the card base. Finally, I stamped a small pink flower on the envelope flap to make them just a little more special.
Once the cards were done, I next needed a packaging idea that would look nice but would mail easily and inside a small padded envelope. I decided to use glasine gift bags. For a closure, I used strips of wide glittered washi and dove tailed one end. Washi was perfect as it's a reusable closure that won't tear paper. In the middle of the strip, I glued a stamped thank you medallion made from Royal Sundance Felt. I am very pleased with the pretty look of this packaging. All in all, the thank you cards turned out even better than I expected. Challenge accepted and conquered!
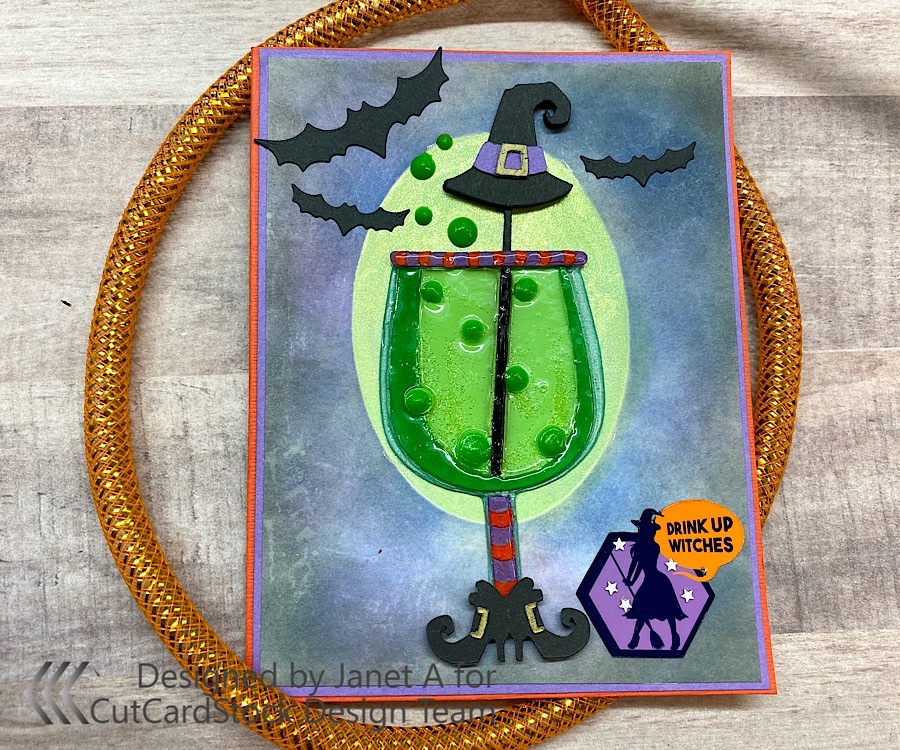
Mix yourself up a ghoulishly fun Halloween card with CutCardStock and a few other supplies. This one has a few steps but is so totally worth it to get the look of a transparent glass complete with fizz, bubbles and a few bats to spare!
Because this is hard to get a good photo of, I've made a video tutorial for you. There you can see much better how cool the drink looks on this card.
The A2 card base is formed using Odobo Orange cardstock. It's also used for the goblet rim and stem. The goblet's base shape is made with Stardream Metallic Lagoon. Pop Tones Grape Jelly is used for the card panel mat, the witch's hat band, goblet rim and goblet stem accents. The hat, boots and bats are Basis Black cardstock. The green liquid is Pop Tones Limeade Cardstock. The main card panel is Neenah Classic Crest Solar White. Smaller bits of that were also used for the buckles. To get a metallic look, I colored them with a gold paint marker.
To ink the card panel, I started by covering it with Antique Linen Distress Ink. Then I applied an oval paper mask so I could ink up the night sky around the "glow" without covering it up. After the Antique Linen, I used Oxide inks in Blueprint Sketch, Wilted Violet and Black Soot. Then I removed the oval mask and applied the negative mask from the oval cut so I could work just on the glow element while protecting the dark areas I had already blended.
To make this area glow and also seem to cast light through the goblet, I needed to make it a bit more green than the Antique Linen by itself. I blended a coat of Cracked Pistachio Oxide ink first. Then I applied a coating of Cosmic Shimmer Opal Blaze Polish in Gilded Avacado. This gave it the perfect greenish glow!
I found the goblet cut file in the Silhouette store but if you don't have a Cameo, you can purchase this file as an .svg and use it on any cutting machine that accepts an .svg file. Except for the main glass goblet shape, I glued 2 layers together to form a more substantial die cut. The hat drink stirrer has three layers so that the stir section looks more dimensional. I applied a fourth hat layer on foam tape for additional dimension. The boots are also lifted on foam tape.
Inside the glass, I applied small areas of glue at the bottom and in vertical lines to the top. Then I applied microglitter in a lime color. I was aiming to create a fizzy look with the glitter. I then applied the cut bubble pieces in the areas of the glitter so the bubbles are coming up with the fizz.
Next I covered the entire goblet with Glossy Accents. The cut cardstock bubbles resisted being covered due to their height and this was another reason I put them on even though I would cover them up eventually. Once dried, I used Beads in a Bottle in Peridot on the bubble cuts. I also applied a few bubbles outside of the glass using the Beads in a Bottle. Then I applied the bat die cuts.
My sentiment was made from a Cricut File. It is the witch figure and the speech bubble. I placed her on a purple and black octagon and converted it to a print then cut graphic. Look for cut #M10001F4A in Design Space.
This is a fun card to make and looks great when completed. Unfortunately, it is hard to get a great picture of it because of the shimmer and shine on and around the goblet. I hope you'll give it a try!
What is the best thing about fall? The colors of course! I love the golds, dark reds, eggplant purples and greens of the fall season. How about you? Today’s card let me indulge in my favorite color combos of the season.
Hello my crafty friends! Today I have a little trip to the beach for you.
I started by going into Cricut Design space. As I often do, I start by creating a shape that represents the card front size I'm going to work on. In this case, it is a 4 1/4" x 5 1/2" rectange. I use this to guage the sizes I will need for the Cricut elements I choose to use for my card.
I looked for a print-then-cut beach scene. There are several to choose from but this one is what I chose to work with. It's image #MB9029A1. It's a rectangle shape so I printed and then cut it with my machine. I then used a die to cut it with a nested die in the shape you see. I used two more of the dies to create two more mats in gray and in the woodgrain paper.
I used several brad sets from Eyelet Outlet to decorate this card. Included are the Crab & Lobster Set, the Sandcastle Brad, Beach Umbrella, Sunglasses-Color, Seagull Set and the starfish and sand dollar are from the Seashore Set. Brads are such a quick and easy way to embellish your cards with cute accents or to build a scene like I did here. Once the brads were set, I glued the image and mats onto a Stardream Metallic A6 card base.
Well, I hope you enjoyed our little trip to this beautiful beach. Have a great day!
Are you thinking like I am that school is starting and summer is almost gone? I know I am. I refuse to give it all up just yet though and today’s card is my way of just saying no!
Have you tried the Slimline card style yet? This is my first of it and I now completely understand the new craze! The tall slim size is fun to work with because you can build vertical scenes that are just not really possible with the typical A2 card size.
So it's the dog days of July here in the Carolinas and it's hot and humid! I always enjoy digging out holiday supplies right about now and get a little lost in winter images. Today's card is an example. You can't get much colder than the North Pole!
For this card I used an embossing folder for the background with stars and designs that remind me of wind and snow. I cut a smaller panel from matching metallic cardstock with a postage stamp shaped die. I cut a snow bank out of white and coated it with Diamond Dust. It catches the light so well and has a chunky look that makes you think of fresh snow. I cut out a red and white pole and put a sign on it that says North Pole. I used some Nuvo glitter drops on the sign that dries clear and shiny and looks like ice. Unfortunately you can't see that in the photo very well.
I used Eyelet Outlet'sPolar Bear Brads as the centerpiece of this card. I used Gold Glitter Tape and put my die cut and stamped sentiment heart on it. I used the Hearts Brad Set in red and white and used another large white heart brad on my seam tape bow. I cut some stars out of cardstock with the gold glitter tape attached. I could have saved time and used Gold Enamel Dots but I don't have any at the moment. I added some White Glitter Enamel Dots for some additional snow imagery.
There's nothing more romantic than a wedding where two people are so obviously in love with each other. Such occasions deserve elaborate and elegant cards. For me, that often means I will include gold and silver elements in my card making whether it be in glitter, mirror card or metallics.
Hello. It's July and of course that gets me thinking of Christmas in July. I wanted to use the uber cute Penguin Brads and Polar Bear Brads from Eyelet Outlet and this seemed like a great time to pull them out even if it is 95 degrees outside right now! I made the background using the Santa Washi Tape in strips on top of a white card base. Yes, washi tape! A pretty patterned Washi tapes makes a wonderful background and that idea has opened up many options for my Washi Tape collection. I had a snowflake embossed vellum rectangle in my stash that I had left over from a different project and I think it's great on top of the Santa background. I die cut the lantern and glued it to the velum. The lantern was the perfect size for one of the penguins and bears. These are so cute together in this little scene!
I used my Cricut to cut the banner but I lined the white cardstock with both the Silver Star Foil Washi and the Glitter Gold Washi before I cut it. I have not done this before but it worked great. You can do the same thing with any steel dies too. I love that I can get a bit of glitter and shine without cutting into an expensive glitter or foiled cardstock. Once cut, I stamped and heat embossed the sentiment with silver embossing powder. To finish it, I layered two of our Red Paper Flowers together and put White Glitter Enamel Dots in the center to create a pointsettia look. I also used Silver Glitter Enamel Dots on the banner. Thanks for stopping by and enjoy a little Christmas this July!
Hello everyone and happy Sunday!! Today I have a simple project anyone can make.
This set of mini note or gift cards is a fnished size of 3 1/2" square. The beautiful floral prints are from a new washi tape in the Eyelet Outlet Store called Flower Washi Tape - Wide. And boy is it a wide! It's 2 1/8" in fact.
To make these, I secured the Washi Tape with the six designs on white card stock and then die cut them out. Then I made three more graduated mats to create the card fronts. I placed a Butterfly Brad on each of them. Finally I used strips of the Pink and Clear Jewel Bling Strips to trim the edges of the cards.
Thanks for stoping by today. Do check out the newest Washi at Eyelet Outlet and have a great Sunday!
What could be more cute than a little bear with a face mask? I ask you? I'm here for CutCardStock today. My card is clean and simple and relies on pretty paper colors to send a message of hope, love and good cheer. Nothing can do this more easily than by picking from a variety of colors available at CutCardStock in the Pop Tone line.
On this card I've used six different Pop Tone Colors. The card base and mat panel are Pop Tone Sweet Tooth. Additionally, I cut 1/2" strips in these Pop Tone Cardstocks: Grape Jelly, Limeade, Wild Cherry, Tangy Orange and Banana Split. Yum! I always get so hungry for something sweet when I'm working with this line. But in all seriousness, the colors in this cardstock are lush and they are solid core which makes them a breeze to work with.
Next I cut a card panel 4" x 5.25" and marked each side with pencil ticks so I would have a guide to place my strips and keep them straight with the same amount of space between them. I began by marking 3/8" from the top and then I made a mark at the next 1/2", then at 1/4" and again at 1/2." I repeated the 1/4" and 1/2" tick marks all the way to the bottom where 3/8" should be left when you're done. That done, I could glue the strips to my card panel and trim the edges to match the panel. I never know exactly what colors should go next to each other so here's a tip, look at a color wheel and follow the colors in order shown. This will be most natural and pleasing to the eye and it's the order I used here. My favorite color is purple so I used Pop Tones Grape Jelly at both the top and bottom of the panel which also balances it.
My next step was to cut the bear from a CottageCutz die called Bear Patient. I used Stardream Metallic Copper and Curious Metallic Champagne. I used Stardream Metallic Rose Quartz for the mask. The bear looks fantastic in this color scheme and adds a nice pop of shine. I also used another CottageCutz die called Sending Hugs Bear for the sentiment which I cut 4 times and layered together in Limeade. I used a piece of white fun foam and glued it to the back of the panel to gift some lift when it was glued to the card base. Also at this time, I punched out two lace borders in Banana Split and glued them at the top and bottom of the panel.
I popped my bear up with some foam tape and then placed daisies next to her feet. I used some striped pearl bling in the center of the flowers for an additional pop of dimension and shine. I also used two tiny black gems for the bear's eyes
.
I love how how happy these lively colors make me and I hope this makes you feel a little bit happier too. Want to know what else makes me a happy? A sale! Head on over to CutCardStock and pick up some yummy Pop Tones Cardstock while it's on sale. Today is the last day so don't lose out! Have a wonderful day everyone!
Hello! I'm here for Eyelet Outlet today with a fun card for the dinosaur kid in your life using our new Dinosaur Brads. These are so fun and I love the orange, gray and green/yellow colors used in these brads.
I created the scene in this card by using a mountain die cut and converting the snow to lava to create volcanoes. Now there's not much to mountains so if you don't have a die like this, you can draw and cut a set for yourself and no one will know the difference.
The sky is made with our Cloud Washi Tape. This is a perfect way to quickly create great looking sky backgrounds. It's a neutral blue which means it will go with any and all color schemes used in your card. You can't go wrong and it totally looks like designer paper. I also added a Sun Brad from the Sun and Cloud Brad set. This is another staple you really need to have in your collection. They are perfect in little scenes like this.
I used a few Copic markers to create the ground and the explosions at the top of the volcanoes. I stamped a few palm trees and mixed them up with our Palm Tree Brads so it has added dimension and thickness to the "jungle." Then the scene was ready for the stars of the show, the Dinosaur Brads! They are terrific in this scene.
The green glitter background is made with our Green Patterned Glitter Washi Tape and the striped background is made using the Foil Striped Washi Tape at an angle. The glitter washi tape like all of Eyelet Outlet's glitter tape is shed-free and I like the pattern which makes it more interesting and textured. The foil washi tape is also a great way to get that trendy foil look without mess or fuss.
To finish, I created the sentiment from a combination of stamps I had on hand and using my printer. Another Dino and Palm Tree finish it off.
Before I go, I want to tell you that Eyelet Outlet has gotten in a bunch of New Washi Tapes. Check it out! There's a lot of great ones that have been added to the store. Go to the Washi Tape - Decorative Tape page and all the new ones will show at the top.