Showing posts with label Interactive Card. Show all posts

Owl the Best Wishes on Your Birthday!


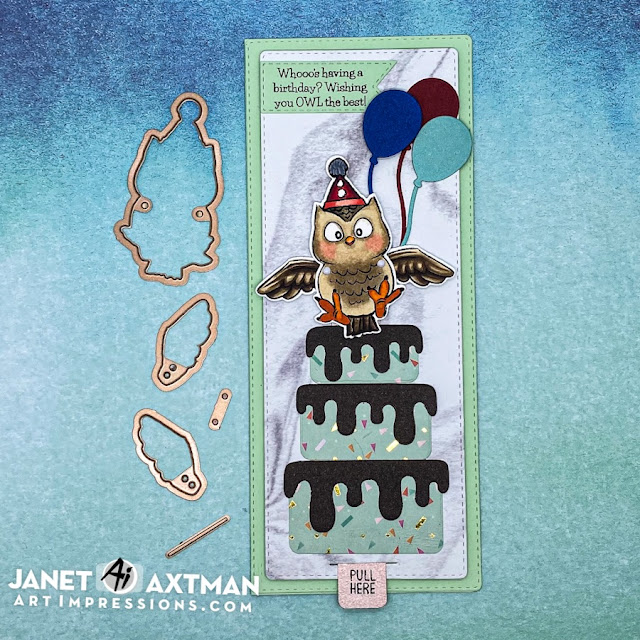
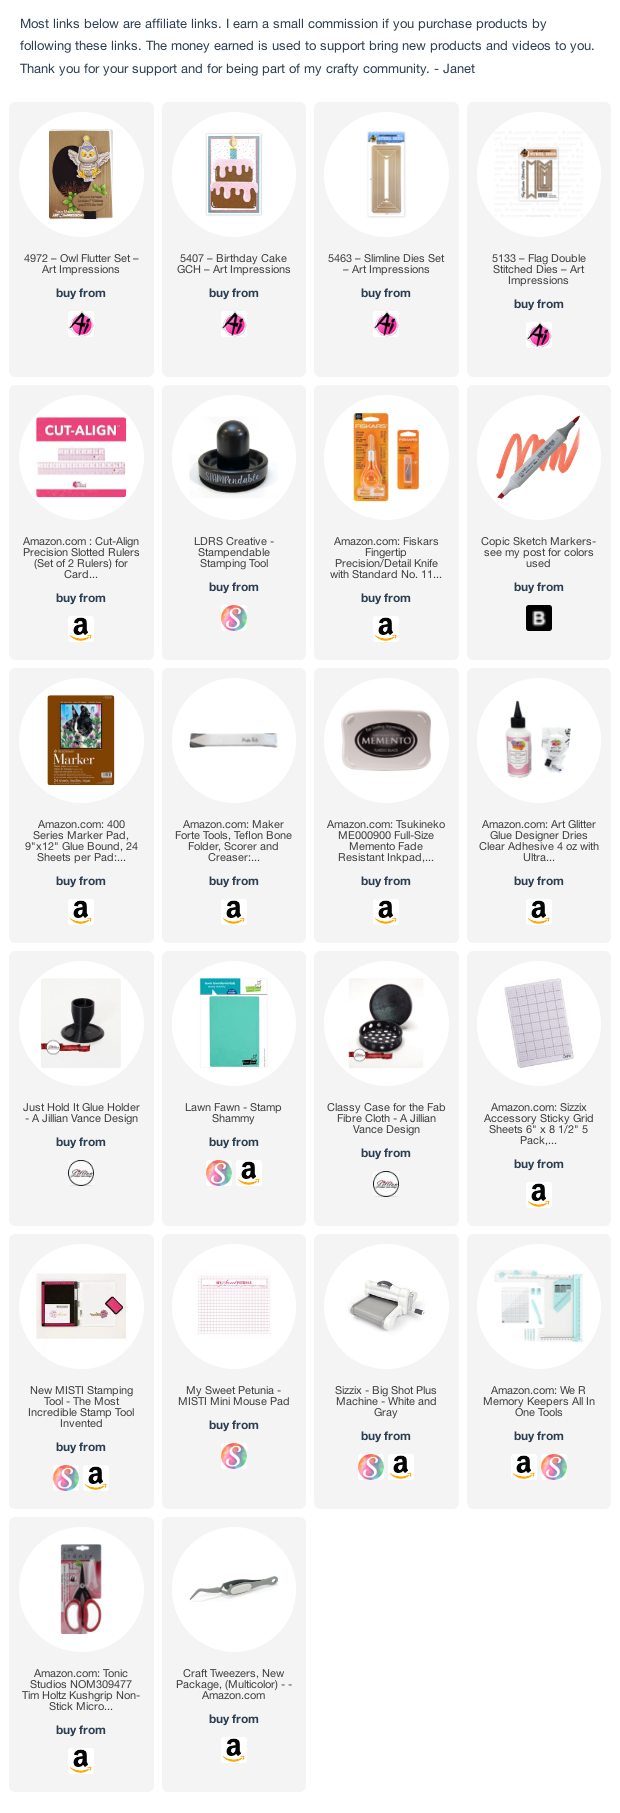
Hi crafty friends! Today I have a slimline card that combines several unrelated Ai sets to create a fun interactive birthday card. This card was made with the 5463-Slimline Dies Set, 5407-Birthday Cake Gift Card Holder Set, 4972-Owl Flutter Set and 5133-Flag Double Stitched Dies.  

The card base measures 8 1/2" by 3 1/2" when folded. On top of the base, I placed a matching cardstock piece cut with a Slimline Die. The next sized die in the set was used to cut the gray marbled mat. I placed the three layers of cake from the Birthday Cake GCH on the gray mat and then stamped, colored and cut out the adorable little owl from the Owl Flutter set on marker paper. I also cut a long pull tab out of rose gold metallic cardstock. I followed the easy Flutter Owl package directions to assemble the winged mechanism and tab and install it under the gray mat. Once done, I glued the gray base on top of the green matt being careful not to glue on or too closely around areas that move. Then I trimmed the tab to the right length and stamped it with a Pull Here stamp from my stash. 
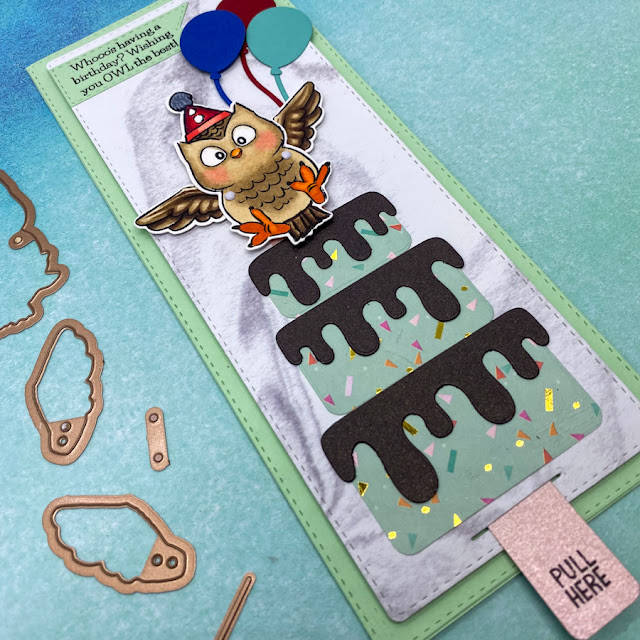
The finishing touches were to stamp the sentiment from the Owl Flutter Set and cut it out with a flag from the Flag Double Stitched Dies set. I also cut three balloons with dies from my stash and arranged all the extra pieces on the card. 

Once complete, pulling and pushing the tab causes the owl's wings to move up and down. I really like how this looks like the owl is landing on top of the cake to wish the birthday recipient. "owl the best!"
Thanks for stopping by today. Please join in on the Ai card challenge. You might win some swag of your choice and challenge yourself with a new technique. Win, win! Click on the graphic above to link up your card.

Happy Creating!
Janet YouTube - Blog - Facebook - Instagram - Pinterest 

Cool As a Cumber Workout Gal


Happy Saturday everyone! Today is day 3 of the Shimmy and Shake Challenge over at the Art Impressions Blog. This challenge is right up my alley. I love making interactive cards. Today I used a Wheelie set 5095 - Workout Gal. Isn't she as cool as a cumber? I love that she's drinking wine instead of water and that she's all glammed up instead of sweated up. Wish all of us could look that good when we're getting in shape!

Hen House Pop-Up Card - Farm Fun!


Happy Saturday and the start to the ever popular Memorial Day Holiday weekend here in the U.S.A.! This is the official start to summer and to celebrate, my project features the new Hen House Critter Cubbies set from Art Impressions. I added a twist to this by making the hen house into a pop-up feature when the card is opened.

Ai has six free stamps that can be earned with each qualifying order. This year's freebies have a definite farm vibe and I used three of them on the front of this card. They are perfect to give a hint of what will be found inside. Aren't they adorable?


If you'd like to see how I made this card, check out the video tutorial below. I'll show you how to create the pop-up mechanism using a paper cutter and a few simple measurements. You won't believe how easy it is to create this look which could be done with many of the "house" style Critter Cubbies sets.


Thanks for stopping by. I hope you have a great weekend!

Happy Creating!
Janet YouTube - Blog - Facebook - Instagram - Pinterest 


<!

Froggy Fun! Pop-Up Flip Card

  Hi everyone! Today I have another interactive card for you. This one features the Frog Set #5283.

There are several images in this set along with some ribbitting sentiments! On this card I chose to use, "Hoppy Birthday" on the front and, "Sorry, I Toadally Frogot" on the inside. There are many great sentiments to choose from to go with the adorable frog images.
 I chose the frog that is chillin' out on the mushroom. To me he looks like he's really enjoying the sun on his belly. The little frog is also enjoying a rest too but he prefers a little shade!

These were easy images to color with my Copics. I cut and applied a mask to the frog images so I could use Oxide inks to put in the colorful sky. I used a heart enamel dot along with some orange gems to decorate the front as well.  

This card is a fun interactive style. What I like best is that it's almost perfectly flat when shut so it mails easily. When it's opened, the center circle pops up and tucks behind the sentiment. It works similar to an easel card except that it pops up on its own thanks to the mechanism inside. 

If you would like to make this card, I've got a full tutorial on my channel. Just click on the thumbnail below.

Copic Colors Used:
Frogs & Grass: YG03, YG63, G99
Mushroom: R32, R35, R37, R39, E31, E33, E35, E37, C0 C1
Distress Oxides: Spiced Marmalade, Cracked Pistachio, Squeezed Lemonade

Thanks for spending a few minutes of your Saturday here at the Ai blog. Enjoy your weekend!

Happy Creating!

Janet YouTube - Blog - Facebook - Instagram - Pinterest 

What's An Invisible Slider Card? Read to Find Out!

Hello clever crafty friends! Interactive cards are one of my favorite styles. The new Sheep Set has many different characters and I couldn't resist making a slider card with it. I used the sign, present and balloon images from the Art Impressions Holiday Mansion Birthday Set #5097 to set this animal party scene as well.

Below is the card in the resting position. There is a "herd" of four sheep and a lamb. Clearly these sheep are partying down! Don't you just love their expressions. The one with the crown and red shoes just makes me laugh. She really thinks she's all that doesn't she?

Next is the card with the interactive tab pulled. Now we see the sweet lamb completely and an "unbaa-lievable" sentiment below. I love that this has a little surprise message that you never know is there until the tab is pulled. 

Notice also that there is no slider slot to be seen. This style is called the invisible slider card. There is  a slider slot involved but it's behind the dark green grass panel where you can't see it working There is a simple slider mechanism that comes up behind the dark green panel and folds down. It is attached to the middle sheep but it's hidden behind him. This gives the illusion that the moving sheep are floating across the card when the tab is pulled. 

Other than a slider slot die, I made the tab and mechanism without special dies. Some companies sell a set to make this style but really it's several simple pieces you can make yourself. Even the slider slot is fairly simple to make using a craft knife and a ruler. I used to do that until I knew I wanted to make slider cards regularly.  

I chose to use a stitched hillside die and a spikey hillside grass die from Lawn Fawn. I also used their Cloudy stencil to create the blue cloud background. The stitched clouds are from CottageCutz. 

There is a complete tutorial showing how to make an invisible slider card using the new Sheep Set on my channel. I invite you to stop by and see how I put this together.


The new Sheep Set has so much personality and so many punny sentiments, you really need to check it out at the store. It's super fun and guaranteed to bring a smile to everyone's faces. It's also pretty easy to color these sheep. I used three different COPIC blends for them so they would stand out from each other but you could easily use the same blend if you wanted.
SHEEP COLOR BLENDS:
Cool Gray Blend: C1, C3, C5, Colorless Blender
Warm Gray Blend: W1, W3, W5, Colorless Blender
Bluish Gray Blend: B60, BV31, BV23

Thanks for spending a few minutes of your Saturday here with me. Enjoy your weekend!

Happy Creating!

Janet

YouTube - Blog - Facebook - Instagram - Pinterest

I'm proud to enter this card in the following challenge blogs:


Interactive Flip Card

Hello everyone! Today I've got a fun flip card style for you to make. Below is the front of the card.


When you pull on the tab, the first rectangle flips to reveal another one behind it.


For my rectangles and squares, I used dies from CottageCutz (squares) and Lawn Fawn (rectangles). If you don't have these dies, I've provided the measurements here so you can cut yours to the same dimensions. Then if you want, you can adjust this pattern to fit your supplies.

Please visit my video tutorial for directions. 


RECTANGLES FOR CARD MATS:

1) Outer Blue Mat
    Lawn Fawn Outside In Stitched Rectangle Stackables
        * 5 1/4" x 4" largest rectangle in set
2) Inner Polka Dot Rectangle
    Lawn Fawn Large Stitched Rectangles Stackable
        * 3 1/2" x 3 1/4" second largest rectangle in set
3) Scalloped Stitched Squares Used for the Flip Elements
    CottageCutz Nested Stiched Scallop Squares
        * Largest outside scallop square is 2 1/2" square - third largest die in set
        * Smaller inside scallop square is 1 7/8" square - second smallest die in set

4) Stitched Square Set Used on Top of Scalloped Rectangles
    CottageCutz Stitched Square Set
    * Largest Square measures 2" - 5th square from the outside
    * Smallest Square measures 1 5/8" - 4th square from the outside
4) Pull Tab Mechanism
    Cut at 1 5/8" wide by 5 1/8" long. Score at 1 5/8" and 1 7/8"
    You can glue two layers together to make this pull extra strong or use 110 lb cardstock to make sure         it will hold up with use.

5) Optional tag die to use on the pull end of the mechanism. Choose any tag die that is approximately or close to 1 5/8" wide. You can trip any excess like I did in the video as it won't show. You can also use a corner rounder to make the corners rounded if you don't have a tag die. Another option is to cut this using an electronic cutter by modifying a tag pattern. There are many ways to create a nice pull tab. Just remember to punch a hole in it so you can add a piece of ribbon.

OTHER SUPPLIES:
 
1) I used an older label punch from Stampin Up. If you don't have this, you can use another label punch of any brand as long as the width is at least 1 6/8" or larger. You can also cut a long skinny rectangle into the smaller rectangle mat (polka dot mat) that is 1/4" wide by 1 6/8" tall.

2) I punched a notch in the polka dot mat using a 1 3/4" circle punch and only punching it partially. I think any circle punch over 1" would work as well. Just judge how far in to punch the notch shape. On mine, the notch is about 3/8" deep from the edge but this is approximate. Eyeballing it should work fine for you. 

3) The owl character I used on the purple card is a no name brand that someone gifted me. If you want to do something like this, just pick any cute little character you have in your stash.

4) I have used several Eyelet Outlet Supplies for this card: 


Thanks for stopping by today. I hope you'll give this card style a try. It's a fun one to make!

Hugs,
Janet