I bet most of us remember typewriters and rotary phones. It’s hard to believe but those things are now considered vintage. Does that mean I’m vintage too? Never mind. Don’t answer that!
Today I have a pair of valentines featuring old fashioned machinery a lot of us used to know and love.

I love the vivid cardstock colors in the Astrobright line of cardstocks. They are especially great for children’s cards and for lighthearted special occasions like Valentines Day. For these valentines, I used Re-Entry Red for the card bases. The die cuts are cut from Lift Off Lemon, Pulsar Pink, Lunar Blue and a little more Re-Entry Red. You can purchase the cardstocks used for this card from CutCardStock's webstore.
Each card is made from half of an 8 1/2 x 11 sheet cut in the middle on the long side. Then each piece is folded in thirds to form a card base that measures 3 3/4″ x 5 1/2″ when closed. To make the folds, score at 3 3/4″ and 7 1/2″. Fold the left side in first and then fold the right side in. Turn the card over and you’ll see that the middle third section of the card base actually forms the front of the card. I cut a window in it so that the side folded under it shows through the front to make a window. The window isn’t visible when the card is opened so it retains a nice finished look inside.

I chose a scalloped circular die to cut the windows. Then I placed a piece of Stardream Metallic Eris cardstock behind each. The look is reminiscent of stainless steel which contributes to the industrial retro vibe of the cards. I used die cut sets of a typewriter and a telephone from CottageCutz. I cut the die pieces out of Astrobright cardstocks and glued them together. I used Pebbles Classic chalks to create more definition and shape to the finished die cuts. Foam tape was placed under the phone and typewriter die cuts and set aside.

Before placing the pieces in the windows, I used an embossing folder to create the conversation hearts card front. Mine isn't available anymore but here is one that is similar. You can see the pieces after completing all the steps above.

I used silver gilding wax to give the embossing a more distressed and metallic look. I never quite know the best way to apply wax but in this case I used a tiny bit on my finger and spread it around, repeating as needed. Then I buffed each front with a paper towel to make it even shinier.

Here’s a close-up of distressed conversation hearts. I really love how this looks and it’s so easy using the gilding wax.
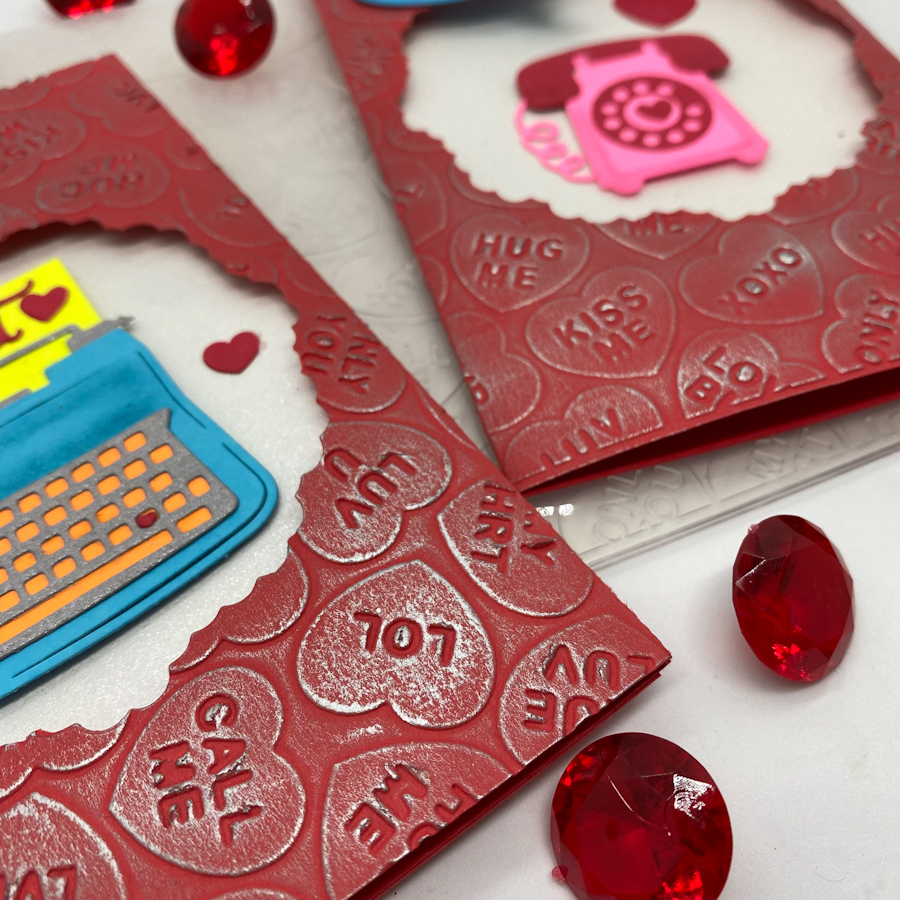
I added some red cardstock hearts and a few sequins as a finishing touch. Tape runner was used to secure the flap behind the window.

I really enjoyed making these cards with vibrant Astrobright cardstock. I don’t think they would be same without the bright colors and smooth finish. The cardstock does everything you ask it to. It’s a must-have for your cardstock stash. Visit the CutCardStock webstore for all your valentine card making.
Thanks for stopping by today. I hope you're having a great week!


No comments