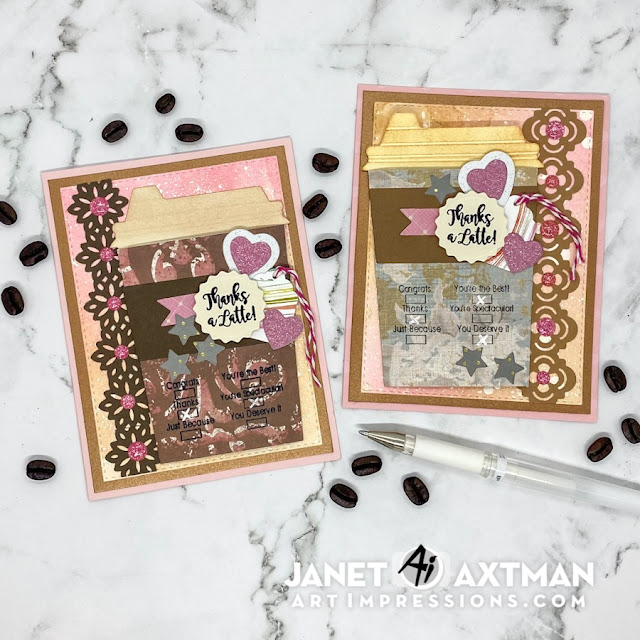
My "Coffee" Cup Runneth Over For You!

A Latte To Love In These Gift Card Holders!
Camping Beach Bums Using Karin Brush Markers
My family enjoys camping and we get out pretty regularly with our travel trailer. We live within a few hours of the beach and beach camping is something worth doing! When I saw the Happy Trails Set, I knew I had to have it because it mimics our own camping life so much.
For this card, I stamped most of the images in the set. There is a cute balloon and light string that I didn't use. There are six sentiments such as Home is Where You Park It, Happy Trails, Happy Retirement, Happy Camper and more. I thought the sentiment I chose was perfect for this very relaxed and happy couple. This would be great for his birthday, Valentine's Day or Father's Day.
I colored the images with Karen brush markers. For most of the images, I chose one color and used water to blend and create shading. You can get similar results from a water brush or the Karin Blender Marker. I prefer the control I get with a small round brush. After coloring them, I cut them out with the Brother Scan N Cut.
The sand is a piece of torn gold metallic cardstock. An aqua metallic cardstock was used for the sky. Bordering the main panel are bright blue and hot pink mats. The 8 1/2 x 3 1/2 slimline card base is made of lime green. All my cardstock came from CutCardStock.
I used many neon colors on this card. Have you noticed that neon is making a comeback? It's a lot of fun for summer cards. What cards are you making with a summer theme? There's plenty of great summer themed sets to be found at the Ai Store.

Swimsuit Summer Shadow Box Card
My name is Janet and I am a card maker! I don't know why but I felt a need to confess that to you. Ha ha! Anyway, one of the things I appreciate most about card making is that there are so many styles and designs of cards to choose from when making cards. There's never a dull moment!
Today I've made a shadow box card from an electronic cutting pattern offered by Lori Whitlock called Shadow Box Card - Swimsuits. I purchased the .svg file and cut this out using my Cricut Explore 2 machine. It's also offered as a Silhouette file if needed.
I've been eyeing this fun file for a while now. It's colorful and reminds me so much of growing up when a trip to the community pool was nearly a daily occurrence for my sister and I. Our suits were always left on the line overnight to dry and be pulled on again the next day. This pattern is really well suited for Pop Tone cardstock offered at CutCardStock and I am glad to finally be giving this one a try.
Below are the colors I used. I warn you that you are going to be wanting something sweet after reading these names. They really embody the Pop Tone colors of the cardstock in a yummy way:
- Box Panels: Pop Tone Sweet Tooth
- Frame and 2-Piece Suit: Pop Tone Wild Cherry
- Swimsuit and Sun: Pop Tone Banana Split
- Men's Trunks: Pop Tone Grape Jelly
- 1-Piece Suit: Pop Tone Blue Raspberry
- Clothes Line: Pop Tone Black Licorice
- Grass Hill: Astrobright Gamma Green
- Sky Background: Stardream Metallic Aquamarine
The first step after downloading the file was to import it into Cricut Design Space and cut all the pieces. There are many individual cuts for pieces and parts of the bathing suits and scene. I've learned to pull out a platter and put all my cut pieces on it as I go. That way I avoid misplacing even the smallest pieces. There's nothing more disruptive to your mojo than cutting all your pieces and then misplacing one or two!
It was pretty easy to determine where the colored pieces went. The white panels had the shapes cut out so I matched the shapes and glued them on. Here's what the three interior panels looked like after gluing.
The three interior panels go in next. You can tell what goes first because each panel's scene window is slightly smaller than the one before. It's easiest to fold the box nearly flat, insert the panel inside and work both side notches into the slits. These are not glued. They simply rest in the notches.
Shake Your Tail Feathers - Retro Neon Flamingo
It's HOT out there right? For my neck of the woods, the humidity has been worse than the heat but it all gets me to dreaming about bright colors. In this case, neon colors. I've noticed that neons are making a comeback this summer. Lots of manufacturers are putting out neon inks, papers and embellishments. Welcome back to the 80's ladies and gentlemen!
2 Ways to Color a Cat with Copic Markers & Tips for Shaker Card Elements
In today's project, I've combined two of my favorite things - shaker windows and a loveable kitty. This little cutie is one of four animals in the Loveable Animals set. It comes with accessories for the animals to hold and several sentiments. Each animal die cuts open the arms so that the characters can hold a package, a piece of paper, a cupcake and more.
This kitty was Copic colored. The colors can be found at the end of this post. In the video for this card, I show you how to make a simple cat with some basic shading as well as how to take it up a notch and add his stripes. I'll also give you a few tips on how to make the window frame for a shaker and on placing a shaker element on a card base. The full tutorial is below:
Copic Colors Used:

A Baby Is Brewing!
The coffee cup and steam images were no line water colored with Zig Clean Color markers. The words were drawn on the striped cardstock with a fine tipped pen on the Cricut Explore 2. I used the Cricut to create the blue, pink and white banner too.
The Pregnant Lady and Pacifier brads are used on this card. A cute daisy between the two cups is from the Colored Daisy Brad Set. I think it's just perfect!
Beach Chickens Rule! Beachy Card Tutorial Using Zig Clean Brush Markers
It's summer and it's time to hit the beach! The new Gull Friends Set is so perfect for a fun beach theme. First up is an A2 card featuring a group of Gull Friends showing off their attitude on the beach. The second card is a bright slimline card made into a fun birthday card.
To make the first card, I started by masking off the lower part of the card panel before stamping and white heat embossing a wave background. I blended three tones of blue Distress Oxide inks over the top of this. The sand was created using two Distress Oxide inks and then I coated it with sand embossing powder. I stamped the sentiment flag in black and coated the edges with sand embossing powder before applying it to the card. The result is a super textured card in pretty beachy colors.
Paper Piecing Tips for Intricate Cards
Today I have a pair of cards that were made with paper piecing dies using several colorful Pop Tone cardstocks. Paper piecing popularity is a trend that has come and go over time and it's making a strong comeback again this year. It results in beautiful textured and layered pieces.
I chose two dies and 7 colors of Pop Tone cardstock for my card images: Sweet Tooth, Limeade, Wild Cherry, Tangy Orange, Banana Split, Pink Lemonade, Grape Jelly. Are you hungry yet? The line has such yummy sounding names! As great as that is, there's so much more to choose from with 24 different color options.


